Uncategorized
Solar Hot Water Tank Sensor Guide for Melbourne Homes

May
A cold shower on a bright Melbourne morning usually sends people looking at the booster, the weather, or the age of the tank. Fair enough. But one of the most common blind spots is the small part that tells the whole system what's happening, the solar hot water tank sensor.
The pattern is familiar. The roof has had sun, but the water is barely warm. Or the system still gives you hot water, but the electricity bill has crept up because the booster is doing more work than it should. In many homes, the fault isn't dramatic. It's a sensor feeding bad information to the controller, or a sensor that's fine but blamed for a bigger control or circulation problem.
That's where most online advice falls short. It often jumps straight to “replace the probe” without dealing with the way Australian systems are set up, especially older systems in Melbourne where collectors, tanks and controllers may not all be from the same era. Practical troubleshooting starts with the sensor, but it doesn't end there.
Why Is My Solar Hot Water Not Working
A homeowner rings after two or three sunny days and says the same thing: “It was working last week, now the shower goes lukewarm halfway through.” Another says the opposite. “There's hot water, but the booster seems to be running all the time.” Those two complaints can come from the same cause.
The tank sensor sits in the background until it stops doing its job properly. When it fails, drifts, loosens off, or loses clean contact with the tank, the controller can no longer make sensible decisions. The result is simple. The pump may not start when solar heat is available, or it may run when there's no useful heat to collect.
That's why a system can look normal from the outside and still perform badly. The collector is on the roof, the tank is full, the controller has lights on, but the logic chain is broken. If you've already read general fault guides such as common problems with solar hot water, the next step is narrowing down whether the sensor is the culprit or just the first suspect.
Heating faults also aren't unique to solar systems. If you want a plain-English comparison of how everyday hot water and heating failures are diagnosed in another context, this practical guide to Poole Bournemouth heating problems is useful because it focuses on symptoms first, not assumptions.
A solar hot water fault becomes expensive when the system still “sort of works”. Those are the jobs where the booster hides the real problem for months.
The Sensor's Role in Your Solar Hot Water System
The easiest way to think about the sensor is this. It's not the muscle of the system. It's the messenger. The controller is the decision-maker, the pump does the physical work, and the tank and collector are where the heat lives. The tank sensor tells the controller how warm the stored water is, and that information only makes sense when it's compared with the collector sensor on the roof.
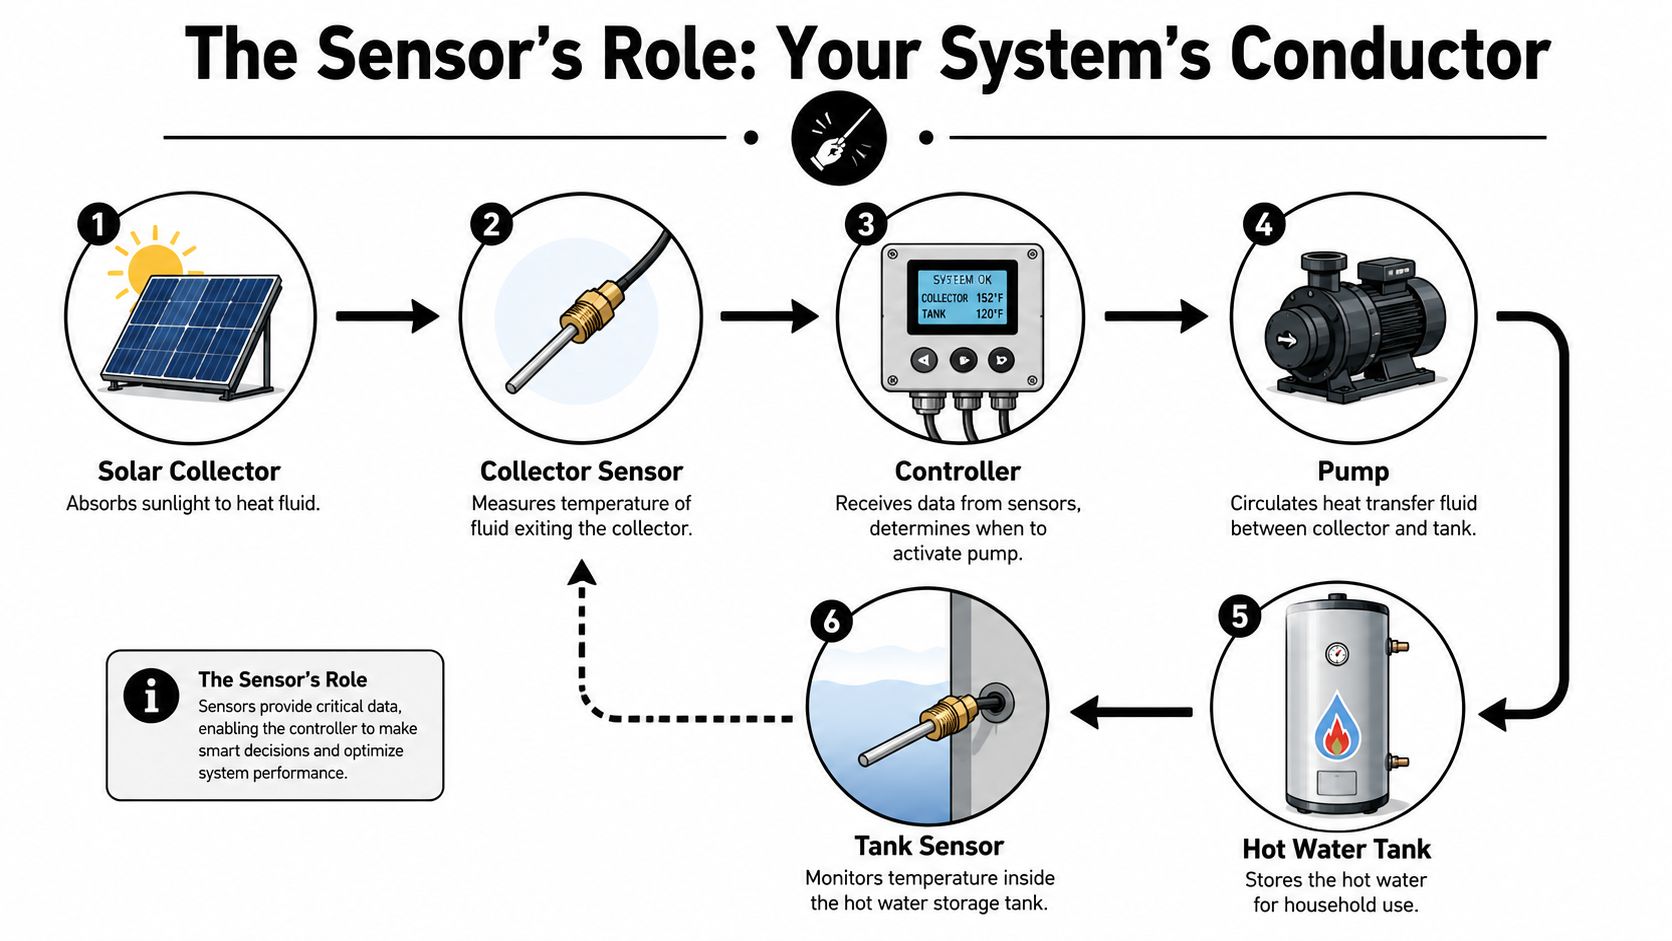
How the differential control loop works
In an active solar hot water system, the controller reads two temperatures. One is at the collector. The other is at the storage tank. The controller compares them and decides whether there's enough useful heat on the roof to justify running the circulation pump. The Pacific Northwest National Laboratory notes that active solar hot water systems rely on sensors to measure both tank and collector temperatures, and the controller uses this differential to decide when to run the circulation pump, which helps prevent heat loss at night or during poor conditions in its solar water heating guidance.
That logic matters more than people realise. The system doesn't want “hot roof” in isolation. It wants a roof that is hotter than the tank by enough to move worthwhile heat into storage.
A healthy system usually behaves like this:
- Sunny roof, cool tank. The controller starts the pump.
- Cloud rolls in, temperatures narrow. The controller stops the pump.
- Night-time or cold conditions. The pump stays off so the roof doesn't cool the tank.
- High-temperature or protection event. The controller reacts according to system design and settings.
What happens when the tank sensor lies
A bad tank sensor doesn't always fail completely. Sometimes it reads too warm. Sometimes it reads too cool. Sometimes it lags because it isn't seated properly in the thermowell or clamped tightly where it belongs.
That creates very specific behaviour:
| Fault pattern | What the controller thinks | What you notice at home |
|---|---|---|
| Tank reads hotter than it is | “No need to harvest solar yet” | Weak solar gain, more booster use |
| Tank reads cooler than it is | “Keep collecting heat” | Pump runs unnecessarily, wear increases |
| Sensor reading jumps around | “Conditions are changing constantly” | Short cycling, erratic controller behaviour |
| Sensor loses contact with tank | “Tank temp is unreliable” | Poor performance that comes and goes |
Practical rule: If a solar system gives inconsistent performance rather than a full shutdown, check the quality of the sensor reading before replacing pumps or controllers.
Why placement matters
The tank sensor isn't just any probe pushed somewhere near the cylinder. In many systems, it's installed in a designated pocket or positioned low on the storage cylinder near the heat exchanger area so the controller can respond to the actual stored heat profile. If it's loose, offset, or hanging in ambient air, the controller is making decisions from bad data.
This is one of those faults that looks electrical but causes hydraulic consequences. Bad sensor data changes pump run time, affects heat transfer, and can push the system into more auxiliary boosting than the homeowner expects.
Common Solar Tank Sensor Types
If you're trying to identify what's fitted to your system, start with two questions. First, is it a temperature-sensing probe that gives a variable reading back to the controller, or is it a simple switching device? Second, is it mounted inside a pocket, strapped to a pipe, or threaded into a specific fitting point?
Thermistors and simple thermostatic devices
Most solar differential controllers in residential systems use a resistance-based temperature sensor. That means the controller expects a specific resistance curve from the probe as the temperature changes. These are often called thermistors or similar resistance sensors, depending on the controller design.
A thermostat-type device is different. It usually acts more like an on/off switch at a set point, rather than continuously reporting temperature to a differential controller. In solar hot water, that's not usually the part people mean when they talk about the tank sensor.
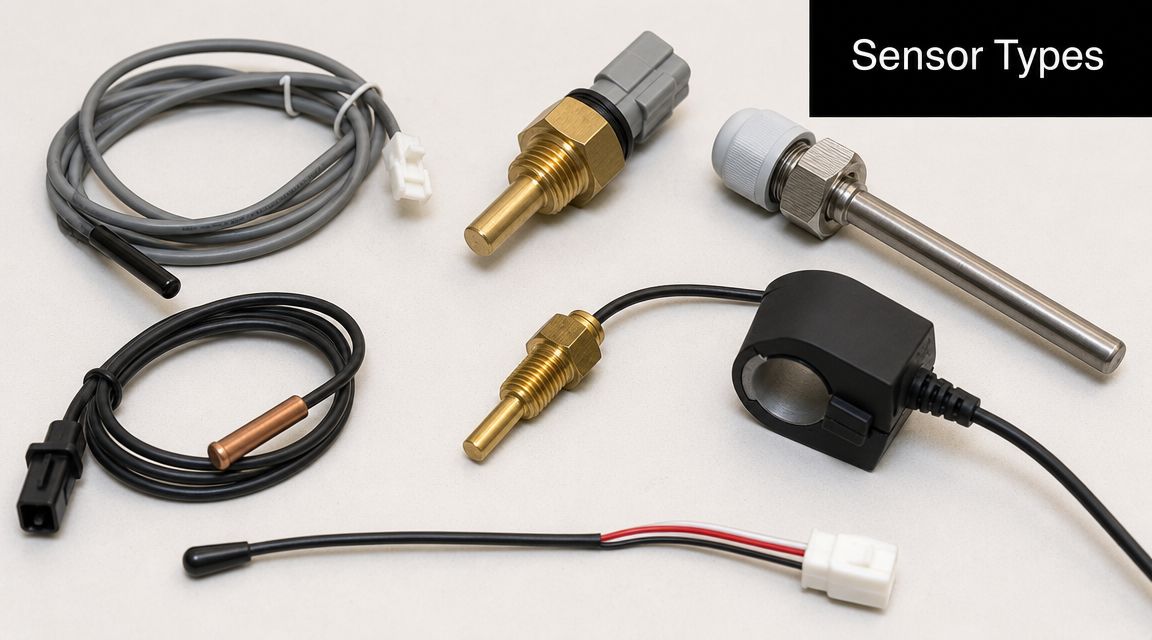
The physical forms you'll see
The sensor body matters almost as much as the electrical type.
- Immersion probe in a thermowell. This is common on tanks designed for sensor pockets. The probe slides into a dry sleeve, so replacement can be straightforward if the well is intact.
- Strap-on or clamp-on sensor. This sits against pipework or the tank surface and relies on firm contact and insulation around it.
- Threaded roof or collector sensor. Some systems use a threaded probe at the collector end to improve contact and placement consistency.
The U.S. EPA system specification for solar hot water monitoring describes the need for a paired temperature-sensor setup as part of proper metering and energy monitoring, and that paired approach reflects why one lone sensor doesn't tell the full story in the published specification.
Why Australian conditions are harder on sensors
Australian systems deal with high solar exposure, and roof components live in a punishing environment. That means the right sensor isn't just about electrical compatibility. It also needs to cope with prolonged heat, UV exposure around associated cable runs, and the operating conditions at the roof collector.
That's where cheap generic replacements often disappoint. They may fit physically, but if they aren't suited to high temperatures or the controller's expected input, the reading can drift or fail long before the rest of the system does.
The sensor that survives in a shaded plant room isn't automatically the right sensor for a roof-mounted collector loop in an Australian summer.
How to Test a Solar Hot Water Tank Sensor
A proper test starts before the multimeter comes out. Too many people jump straight to ohms, then replace the sensor and wonder why the fault remains. A no-hot-water complaint can come from relief-valve issues, trapped air, poor circulation, or controller settings. The U.S. Department of Energy notes that system output is also affected by broader design and siting issues, and that matters because not every solar hot water symptom is a sensor symptom in its guidance on siting solar water heating systems.
Start with the easy checks
Before disconnecting anything, look at the system as a whole.
Read the controller display
If the controller shows a tank temperature that makes no sense for the time of day, that's a clue. If it shows an error or missing sensor condition, that's a stronger clue.Inspect the sensor lead
Look for rubbed insulation, brittle cable, loose terminal screws, corrosion, or signs of water entry.Check the mounting point
A strap-on sensor should be tight and insulated from ambient air. A probe in a thermowell should be fully inserted and secure.Rule out obvious non-sensor faults
Relief valve discharge, air in the loop, stagnation signs, or controller settings can produce similar symptoms.
If you're already comfortable testing electrical hot water parts, the logic is similar to element and thermostat fault-finding in systems covered by this guide to testing a hot water element, but the solar sensor adds the extra step of matching the measured resistance to the controller's expected sensor type.
Safety before testing
Tank and collector circuits can be hot. Controllers may carry mains power. Roof work brings its own risks.
Use this basic rule set:
- Turn power off before disconnecting sensor wiring.
- Let the system cool if it has been collecting heat.
- Avoid opening pressurised parts unless you know the hydraulic side.
- Don't work on the roof alone.
Testing a resistance-based tank sensor
For most residential solar controllers, the working test is a resistance check with the sensor isolated from the controller.
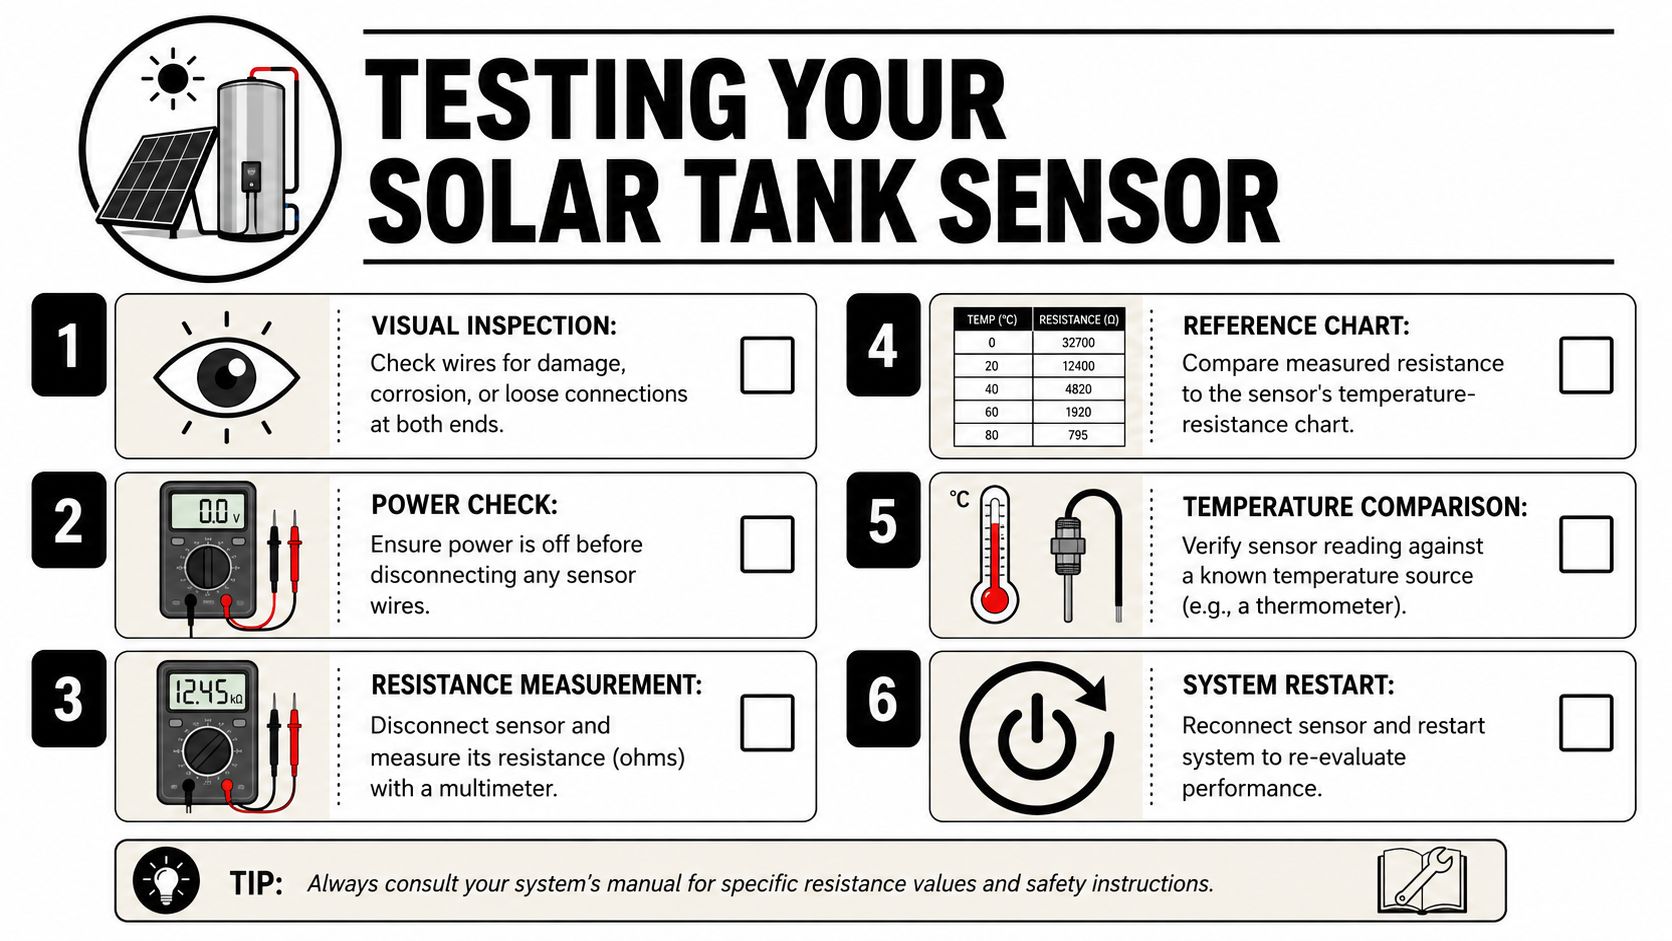
Step-by-step method
- Disconnect the sensor at the controller end so you aren't reading back through the controller circuit.
- Set the multimeter to ohms.
- Measure across the two sensor conductors.
- Measure the actual temperature near the probe location with a reliable thermometer if possible.
- Compare the reading to the correct chart for that sensor type.
This is the point where many DIY repairs go wrong. People use a chart for the wrong sensor family. A probe can look identical and still have a different resistance curve.
Example thermistor resistance chart
Below is an example chart for a 10k NTC thermistor. It is only a sample reference format, not a universal chart for every solar controller. Your controller manual or sensor specification always takes priority.
| Water Temperature (°C) | Approximate Resistance (Ohms Ω) |
|---|---|
| 0 | 32650 |
| 10 | 19900 |
| 20 | 12500 |
| 25 | 10000 |
| 30 | 8050 |
| 40 | 5300 |
| 50 | 3600 |
| 60 | 2500 |
| 70 | 1750 |
| 80 | 1270 |
If your measured resistance is nowhere near what the chart predicts for the actual temperature, the sensor may be faulty. If the reading is unstable while the temperature is stable, suspect cable damage or moisture ingress.
A good ohms reading doesn't always clear the sensor. If the cable breaks internally only when hot, the fault may appear only during operation.
When the test result is unclear
Some faults sit between “working” and “dead”. That's common with ageing sensors. In those cases, compare the controller's displayed tank temperature with an independent temperature measurement and watch how the reading behaves over time.
A technician will also look for pattern faults such as:
- Slow response that causes late pump start
- Intermittent open circuit when the cable warms up
- Ambient influence on poorly insulated strap-on sensors
- Controller input faults that mimic a failed sensor
If the resistance looks right but the system still behaves badly, stop treating the sensor as the only suspect.
Replacing a Solar Hot Water Sensor
Once you've confirmed the sensor is faulty, the next trap is buying the first probe that looks similar. That's where a lot of wasted time starts. In solar hot water, visual match is not enough. The new sensor has to match the controller's expected input, the mounting method, and the connection style.
Why compatibility matters more than price
Differential controllers rely on specific resistance-based sensors, and replacing one with a mismatched type can give inaccurate readings even if the sensor is brand new. That's especially important in Australian systems where older collectors and tanks are often paired with newer controllers over time, a point echoed in the background troubleshooting discussion linked from this controller compatibility example.
A mismatched sensor usually creates one of three outcomes:
| Replacement mistake | Likely result | What happens in practice |
|---|---|---|
| Wrong resistance curve | False temperature readings | Pump timing becomes unreliable |
| Wrong probe style | Poor contact or loose fit | Slow response and unstable control |
| Wrong connector or cable arrangement | Intermittent or failed signal | Faults return after installation |
Thermowell replacement versus strap-on replacement
A thermowell sensor is usually the cleaner job. The well is a dry pocket. You isolate power, remove the old probe, confirm the well is sound, and insert the new one fully. Depending on the design, thermal paste may or may not be specified by the manufacturer.
A strap-on sensor demands more care than commonly expected. The sensor must sit firmly against the correct point, and it should be insulated from surrounding air so it reads the pipe or tank surface, not the plant room temperature. A loose strap-on install can make a good sensor behave like a bad one.
What to check before you order
If you're sourcing a replacement, verify these details first:
- Controller model. This is the main reference, not the colour of the old probe.
- Sensor type. PT1000, NTC, or another specified type.
- Mounting style. Thermowell, clamp-on, threaded, or collector-specific.
- Cable condition. If the old cable is damaged, replacing only the probe may not solve the fault.
- Lead length and termination. A short or improvised join on a roof run often causes future trouble.
One practical option in the parts market is a PT1000 solar hot water sensor supplied through specialist hot water retailers. For example, Ring Hot Water's solar hot water controller category sits alongside compatible solar control components, which is useful when you need to verify the sensor against the controller rather than guessing from appearance alone.
Don't order from a photo. Order from the controller specification and the sensor mounting method.
When replacement should be left to a technician
If the sensor sits in an accessible dry well and the controller is straightforward, a careful homeowner can often replace it. If the fault involves roof access, perished cable, mixed-brand controls, or uncertainty over the actual sensor type, technician time is usually cheaper than buying the wrong part twice.
Sourcing Genuine Parts and Expert Help in Melbourne
The hard part isn't always diagnosing the solar hot water tank sensor. Often it's finding the exact part that matches a system that has been repaired, updated or pieced together over time. That's common in Melbourne homes. A collector may be original, the controller may be newer, and the tank may have been changed at some point. The sensor has to fit that real-world combination, not the ideal one printed in an old brochure.
Why genuine and exact-fit parts matter
On a solar system, “close enough” creates expensive confusion. A generic probe might physically fit the thermowell, but if the resistance curve is wrong, the controller still receives the wrong story about tank temperature. Then the homeowner ends up chasing pump faults, booster faults, and controller faults that were really compatibility problems from the start.
There's also the wider system to think about. A solar hot water installation is not just a tank and a probe. The U.S. Department of Energy notes that a complete system involves collectors, tanks, pumps and controls, and that collectors and piping should slope by at least 2.1 cm per metre to drain properly in relevant designs, which is one of those installation details a competent professional checks because it can affect operation in its maintenance and repair guidance.
A sensible Melbourne path forward
For Melbourne homeowners, the practical approach is simple:
- Identify the controller first. That's the anchor point for choosing the right sensor.
- Confirm how the sensor mounts. Tank pocket, pipe strap, or collector fitting.
- Inspect the cable run. A new sensor won't fix a damaged lead.
- Use a supplier who understands hot water control parts. General electrical supply isn't the same thing.
- Get installation help when the job touches roof access, mixed-brand systems, or uncertain controller settings.
If you're in Melbourne and want to avoid the trial-and-error cycle, the most useful support is local access to exact-fit parts plus someone who can look at the complete control loop, not just swap a probe and leave. That matters because many “sensor faults” turn out to involve circulation, controller input issues, or poor original installation.
For homeowners who prefer not to test or fit parts themselves, a technician can diagnose the sensor, confirm controller compatibility, and check the wider system conditions that affect performance. For trades, builders, and owners who do want to handle the parts side directly, sourcing genuine solar control components locally makes the process much cleaner.
If your solar hot water system is underperforming and you want a clear path to the right part or a proper diagnosis, Ring Hot Water can help with genuine hot water components, practical advice, and Melbourne-based service support.
