Boiling Hot Water
Zip Spare Parts Australia: Get Your Unit Working Today
Apr
Your Zip unit usually gives you a warning before it stops outright. The light starts flickering. Boiling water turns warm. Chilled water slows to a trickle. Then you open the cupboard and find a damp patch under the tank or around a fitting.
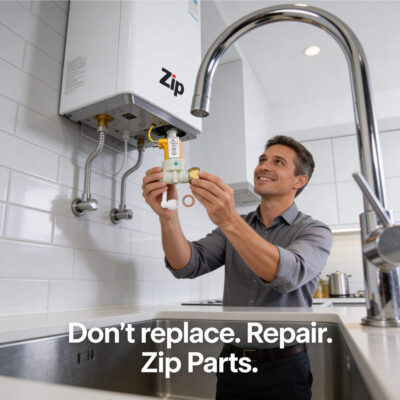
It’s a common practice to jump straight to parts. That’s where time and money are wasted.
A Zip system is repairable far more often than people think. The smart move is to diagnose the fault first, then buy the part that matches the symptom and the model. That matters with zip spare parts australia because there are a lot of similar-looking components across HydroTap units, wall-mounted boilers, chillers, and caravan setups, and they’re not all interchangeable.
Zip has been part of the Australian hot water story for a long time. It was established in Australia in 1947, and in 1970 it installed the world’s first boiling water faucet, a milestone noted by A S Catering Supplies in its Zip manufacturer history. That long product history is one reason parts are still widely available and why so many older units are worth repairing instead of replacing.
This guide takes the same approach a technician uses on site. Start with the symptom. Confirm the model. Check the likely failure points. Then decide whether you’re looking at a simple DIY job, a part-only repair, or a fault that needs a licensed professional.
That Flickering Light Your Guide to Zip Water System Repairs
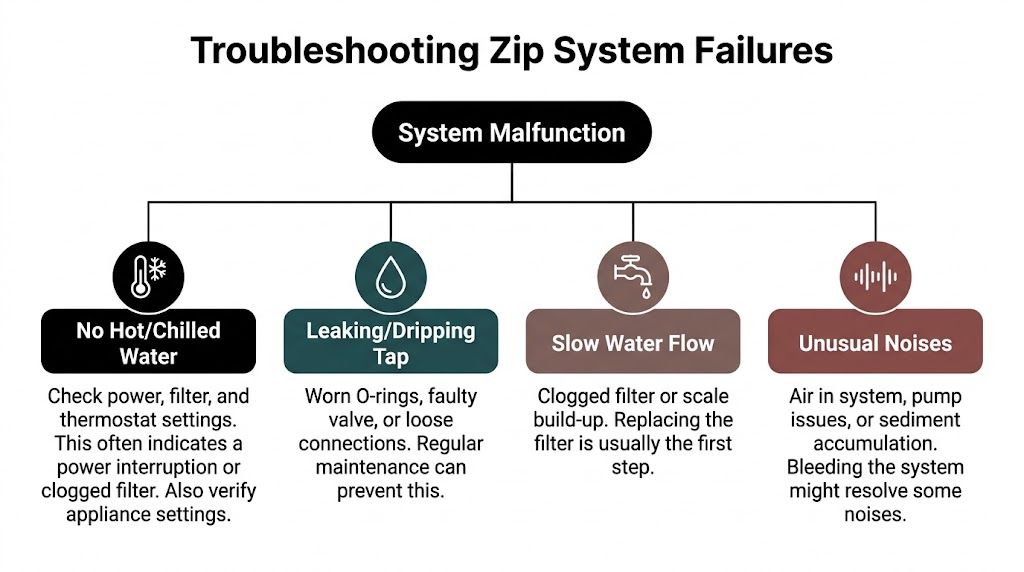
A flickering indicator light doesn’t always mean the whole unit is finished. In plenty of cases, it means the system is trying to tell you something specific. The heating circuit may not be completing properly. A safety cut-out may have tripped. The thermostat may be reading incorrectly. If the water is only lukewarm, the tank may still be energising, just not heating to its proper set point.
The same goes for a puddle under the sink. People often assume the tank has cracked, but the leak may be coming from a hose, valve, or fitting. A dripping tap can point to a worn seal or a valve that isn’t closing cleanly. Slow flow can be a blocked filter, scale build-up, or a supply restriction upstream of the appliance.
Why diagnosis matters first
When someone buys a thermostat because the water isn’t hot enough, they may be right. But they may also be replacing the wrong part entirely. If the element has failed open circuit, the thermostat won’t fix anything. If the over-temperature protection has tripped, replacing both parts still won’t solve the root cause until that protection issue is checked.
That’s why a repair starts with symptoms and testing, not with a shopping cart.
Practical rule: If you can describe exactly what the unit is doing, you’re already halfway to identifying the correct part.
What usually goes wrong first
The most common faults tend to sit in a few areas:
- Heating faults: element, thermostat, thermal protection, wiring connection
- Water delivery faults: inlet valve, internal valve, solenoid, blocked filter
- Leak faults: flexible hose, threaded fitting, seal, valve body
- Control faults: switch, sensor, board, tap head assembly depending on the model
Older Zip units are often mechanically sound even when one service part has failed. That’s why the age of the brand matters. A manufacturer with a long Australian footprint tends to have a better spare parts ecosystem, and Zip does.
If your unit is still powering up, still filling, or still dispensing in some form, don’t assume it needs replacement. In many cases, it needs the right diagnosis and the right part.
First Step Correctly Identify Your Zip Model and Part
Before you order anything, find the exact model and serial details on the unit itself. This is the step people skip, and it causes most wrong-part orders.
On many under-sink systems, the compliance label is inside the cupboard area on the side of the main unit. On others, it may be fixed to the case body or near the rear panel. Commercial boilers and chillers usually have an identification plate on the side or lower body. You’re looking for model code, serial number, electrical details, and sometimes a product family reference.
Where to check on the unit
If you’re standing in front of the cupboard, inspect these areas carefully:
- Side panels of the under-sink unit: common on HydroTap-style appliances
- Rear edge or lower case area: sometimes easier to see with a torch
- Inside the cupboard door area: occasionally installers leave paperwork or reference labels nearby
- On commercial units near the electrical rating plate: especially with wall-mounted boilers
Take a clear photo before you touch anything. That gives you a record of the model, and it helps if you need to compare part listings later.
What details matter
Not every label gives the same level of detail, but these are the ones that matter most:
- Model name or series: this tells you the product family
- Serial number: useful when checking revisions or part updates
- Voltage and wattage details: critical if you’re replacing an element or electrical part
- Tank size or product type: especially important on commercial units
A common mistake is matching a part by appearance alone. Two thermostats can look almost identical but have different calibration, mounting, or wiring layout. The same problem comes up with valves, filter heads, and tap assemblies.
If the part listing doesn’t clearly match your model, stop there. A visual match isn’t enough on a boiling or chilled water system.
Consumer and commercial parts are not the same
Many online searches for zip spare parts australia go sideways. The spare parts ecosystem is split between consumer HydroTap products and commercial boilers from 2.5 to 50 litre models, and the parts are not interchangeable, as outlined on this Zip hot water parts category reference. Commercial components also need to meet specific Australian water safety compliance requirements.
That means a homeowner with an under-sink tap system and a café manager with a larger boiler can’t assume they’re shopping in the same parts pool. They’re not.
How to avoid the wrong order
Use a simple check sequence:
Confirm the appliance type
Is it an under-sink HydroTap system, a wall-mounted boiler, a chiller, or a compact caravan-style application?Confirm the exact model
Don’t rely on memory. Read the plate.Confirm the function of the failed part
Is it heating, flow control, filtration, sealing, or dispensing?Compare mounting and specifications
Electrical rating, fitting size, and orientation all matter.
The trade-off between speed and accuracy
People often want to get the unit running the same day, especially in offices and hospitality venues. That pressure can lead to rushed ordering. In practice, taking a few extra minutes to identify the model properly is what saves the lost day later. Nothing slows a repair down like fitting a part, reassembling the unit, and finding the original fault is still there because the component was never compatible.
For plumbers and advanced DIYers, the best habit is simple. Photograph the compliance plate, the failed component in place, and the connection layout before removal. That one habit reduces ordering errors and makes reassembly cleaner.
Troubleshooting Common Failures What Part Do You Really Need
A symptom points you in a direction. It doesn’t hand you the answer.
When technicians troubleshoot Zip systems, they don’t start by assuming the part. They start by narrowing the fault path. Is the problem electrical, hydraulic, mechanical, or control-related? That’s the only reliable way to buy the right component.
The process below mirrors how faults are separated on site.
Start with what the unit is actually doing
Don’t write down “broken”. Write down the behaviour.
- No heating at all: unit powers on but never reaches temperature
- Water warm, not boiling: partial heating or incorrect control
- Leaking under sink: identify whether it appears during fill, heat, or standby
- Tap dripping constantly: likely sealing or valve closure issue
- Poor flow: could be filter, scale, inlet restriction, or valve problem
- Unit trips or cuts out: safety protection, overheat issue, or electrical fault
That last point matters. A resettable safety device and a failed part can produce similar symptoms from the user side.
How a heating fault is usually checked
A no-heat complaint often sends people straight to the thermostat. Sometimes that’s correct. Sometimes the element is the actual failure.
On serviced Zip units, technicians use a multimeter to check component resistance and continuity. Based on service data from over 500 Zip unit repairs, technicians achieved an 85%+ first-visit success rate in Melbourne by checking resistance and stocking genuine parts, with a 2.4kW element typically reading 10 to 15 ohms, and genuine parts reducing downtime by 40%, according to Ring Hot Water’s Zip HydroTap service reference.
If you’re comfortable with electrical testing and legally permitted to do so in your setting, continuity checks help separate an open-circuit element from a control-side issue. If you’re not, stop at isolation and visual inspection. For a more focused walkthrough, this guide on testing a hot water element is useful before ordering parts.
A failed element usually won’t fix itself after a reset. A tripped protection device might, but only briefly if the underlying overheating fault is still there.
Common Zip faults and likely spare parts
| Symptom | Likely Faulty Part(s) | Ring Hot Water Part Category |
|---|---|---|
| No hot water | Heating element, thermostat, over-temperature switch | Elements and thermostats |
| Water only gets lukewarm | Thermostat, element, scale-affected heating assembly | Elements and thermostats |
| Constant dripping from tap | Valve components, seals, O-rings, tap assembly parts | Valves and tap parts |
| Leak under sink | Flexible hose, fitting, valve body, seal | Flexible hoses and fittings |
| Slow flow from outlet | Filter, inlet restriction, scale-related blockage, valve issue | Filters and valves |
| Unit cuts out during operation | Safety switch, thermostat issue, overheating-related component fault | Thermostats and safety components |
| Chilled side underperforming | Filter, chiller-side component, flow-related part | Filters and chiller-related parts |
The table doesn’t replace testing. It stops you buying blind.
Leaks need location, not guesswork
A wet cupboard doesn’t automatically mean “replace the hose”. Find the source first.
Dry everything thoroughly, then observe:
- Leak appears only during dispense: focus on tap outlet path, hoses, and connections
- Leak appears during heat-up: expansion, valve sealing, or heated connection points become more suspicious
- Leak appears all the time: inlet-side supply, standing pressure, or cracked fittings move up the list
For plumbers, thread type and fitting style matter. A brass fitting that looks right but doesn’t seat properly will waste more time than the original leak ever did.
Don’t confuse maintenance with failure
Some symptoms aren’t failed parts. They’re maintenance issues.
A scaled unit can behave like it has a heating problem. A saturated or blocked filter can look like a valve problem. Air in the line can sound like a pump or internal fault when it’s really a commissioning issue or supply-side disturbance.
That’s why the diagnostic-first approach matters in zip spare parts australia searches. Buying parts is easy. Buying the right one is the hard part.
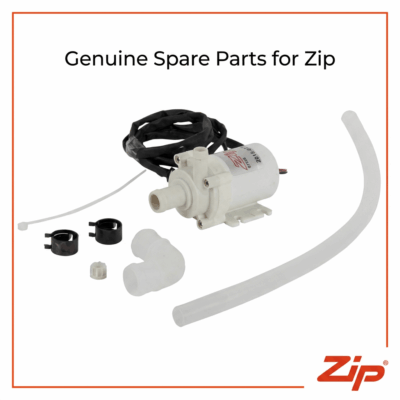
Sourcing Genuine Zip Spare Parts Across Australia
Once you know the fault and the exact model, sourcing becomes much simpler. The key decision isn’t just where to buy. It’s whether you’re buying a part that will behave the way the original did.
That’s why genuine parts matter.
A thermostat isn’t just a piece that fits in the same spot. It needs the right calibration and operating characteristics for the unit. A valve needs the right sealing surfaces and material quality. A filter head or fitting needs to seal properly under normal service conditions without introducing a new leak point.
Why genuine beats generic
Generic parts usually look attractive for one reason. They seem cheaper upfront.
In practice, the trade-off is often poor fit, uncertain calibration, shorter service life, or time wasted proving a part is the problem. That’s especially risky on boiling and chilled systems where temperature control, pressure integrity, and safe sealing matter.
Use generic where the application allows for it. Don’t use generic just because two parts look similar in a photo.
Workshop habit: If a component controls heat, pressure, or water sealing, match the proper specification first and the price second.
The Australian supply picture
Zip has a broad spare parts footprint in Australia. Salin Appliance Spares lists over 639 distinct Zip Water products, covering a wide range of components and applications, according to its Zip brand catalogue. That depth matters because it means many repairs are still viable, from standard under-sink units to commercial installations and caravan setups.
For buyers, that broad availability changes the repair equation. Instead of forcing a full replacement because one component failed, you can often source the exact thermostat, element, valve, fitting, or filter assembly needed.
What good ordering practice looks like
The safest way to buy zip spare parts australia is to verify three things before checkout:
- Model match: exact unit family and revision where applicable
- Part function: what the component does in the system
- Connection details: size, orientation, electrical rating, and mounting
This matters even more when older units have had prior repairs. Don’t assume the part currently installed is the correct original. Plenty of systems have mixed service history.
There’s also a broader industry conversation about on-demand production replacement parts, especially for difficult-to-source components. It’s a useful read if you’re thinking about long-term parts availability in equipment maintenance. For Zip systems, though, critical water and heat-control components still need proper product compatibility rather than improvised substitution.
If your issue is filtration-related, it also helps to review a practical guide to Zip filter replacement before ordering. Many “faults” on the user side turn out to be filter condition or filter compatibility issues rather than deeper appliance failure.
What works and what doesn’t
What works is boring and reliable. Exact model match. Genuine component. Clean installation. Proper test after replacement.
What doesn’t work is guessing from a thumbnail image, forcing a near-fit part into place, or assuming all Zip gear uses the same internals. That’s where callbacks come from, whether you’re a homeowner, a facility manager, or a plumber trying to get a site back online.
A Guide to DIY Replacement and Safety First
Some Zip repairs are realistic DIY jobs. Others aren’t. Replacing a filter cartridge is generally straightforward when the system is isolated properly. Replacing an element or thermostat is more serious because you’re dealing with electrical components, heated water, and sealed connections in a confined space.
The part that matters most isn’t the spanner. It’s preparation.
Isolate before you touch anything
Before opening the case or loosening a fitting, isolate both power and water supply. That means switching off the electrical supply at the appropriate isolation point and shutting off the water feed to the unit.
If you’re not sure which valve isolates the appliance, review a basic guide to the shut-off valve first. A surprising number of leaks get worse because people start undoing fittings on a live supply.
Safety warning: Never work on a Zip unit that is still energised or pressurised. Boiling water systems can hold heat and pressure even after the tap stops dispensing.
After isolation, open the tap to relieve residual pressure. Let the unit cool down if it has been heating. This is not optional.
Replacing a filter cartridge
Filter replacement is often the cleanest DIY task because it stays on the service side of the system rather than the electrical side.
What you’re trying to achieve
You want to swap the old cartridge without introducing contamination, damaging the head, or leaving a poor seal that causes drips later.
A good workflow looks like this:
- Prepare the area: place towels or a shallow tray under the filter position
- Depressurise first: run the tap after isolation to release trapped pressure
- Remove the old cartridge carefully: avoid twisting side load into the head assembly
- Check the seal surfaces: dirt or a damaged O-ring seat can cause a slow leak after reassembly
- Fit the new cartridge squarely: don’t force it if the engagement feels wrong
- Restore supply slowly: watch for leaks while pressure returns
Once the new cartridge is in, flush according to the product instructions for that filter type. If flow is still poor afterwards, don’t assume the new filter is faulty. Recheck upstream isolation valves and any obvious kinks in hoses.
Replacing an element or thermostat
DIY requires increased caution. Access varies by model, and wiring layout needs to go back exactly as found.
Before removal
Take photos from multiple angles. Get one wide shot of the compartment, then close shots of each wire position and connection point. Label wires if needed. Don’t trust memory once the old component is out.
Then inspect before removing anything:
- Look for heat damage: browned insulation, brittle connectors, discoloured terminals
- Check for moisture signs: corrosion near terminals can indicate an old leak
- Confirm the failure point: don’t replace both parts blindly if testing has already identified one
During replacement
Element replacement usually involves draining or partially draining the heated section, disconnecting wiring, removing the retaining hardware, and fitting the new seal and element correctly. Thermostat replacement is usually more compact but no less important, because placement and contact matter to temperature control.
If a gasket or seal comes with the replacement part, use it. Reusing an old compressed seal is one of the easiest ways to turn a successful repair into a leak call.
Keep fittings snug, not brutal. Overtightening can crack components or distort sealing faces.
After reassembly
Refill and repressurise before restoring power where the model requires that sequence. Check carefully for seepage around any disturbed fitting. Only after you’re satisfied the system is watertight should the unit be re-energised.
Then observe the first operating cycle. Watch for:
- Normal fill behaviour
- No drips from repaired points
- Expected heating or control response
- No unusual smell, sound, or fault indication
When DIY stops being sensible
DIY works best when the task is contained, the fault is clear, and you can safely isolate the system. It stops being sensible when you’re guessing, when water has reached electrical areas, or when chilled components and sealed refrigeration parts are involved.
That boundary is what keeps a cheap repair from turning into a dangerous one.
Beyond DIY When to Trust a Ring Hot Water Professional
The best DIYers know when to stop. That’s not caution for the sake of it. It’s what prevents injury, property damage, and repeated faults.
Some Zip repairs are simple because the problem is localised. A filter is due. A hose is visibly worn. A known valve is leaking and the replacement is exact. Other jobs have too many variables to handle safely without the right tools and trade background.
The red flags that should stop you
If any of these show up, hand the job over:
- Electrical signs: burning smell, scorched terminals, tripping power, visible arcing, damaged wiring
- Tank or body leaks: especially when the leak source isn’t clearly a hose or service fitting
- Persistent overheating or cut-out faults: resetting a safety device without fixing the cause just repeats the problem
- Chilled system faults: refrigeration-side issues are not standard DIY territory
- Repeated failure after a part change: that usually means the first diagnosis was incomplete
Commercial sites should be even more cautious. Downtime costs money, but so does a rushed repair that fails in service. For business-critical equipment, a proper diagnosis often saves the second visit.
Why professional diagnosis changes the result
A professional doesn’t just replace the part that looks most suspicious. They verify the fault path, assess related wear, and test the system after the repair.
That matters most when one failed part has damaged another, or when the original symptom masked the underlying cause. An overheated unit may need more than a reset. A leak from a fitting may have already affected adjacent wiring. A poor-flow complaint may sit upstream of the appliance altogether.
For commercial jobs, first-visit resolution is where proper verification pays off. According to a cited service reference, commercial service achieves a 92% first-visit fix rate and performs 12% above national averages through meticulous part verification and bench-testing after replacement, as noted in this referenced service metric source. That kind of outcome comes from process, not luck.
The practical boundary
A good rule is simple. If you can clearly identify the failed service part, isolate the unit safely, and restore it without disturbing complex electrical or chilled components, the job may be suitable for a capable DIYer or plumber working within their scope.
If you can’t confirm the cause, don’t keep swapping parts. That approach gets expensive fast.
The whole point of a diagnostic-first approach to zip spare parts australia is to avoid buying three components to solve one fault. Start with the symptom. Confirm the model. Test where appropriate. Replace what failed. Call for help when the risk climbs above the savings.
If your Zip unit is leaking, underheating, cutting out, or you’re not confident you’ve identified the right part, talk to Ring Hot Water. They supply genuine parts Australia-wide and handle professional diagnosis, repairs, and servicing across Melbourne for homes, workplaces, hospitality venues, and trade customers.
