
Uncategorized
Caravan Water Tank Cleaner: Your Complete 2026 Guide
Jul
You fill the kettle at camp, flick the switch, and wait for that first cuppa. Then the smell hits before the steam does. Stale water, a plastic tang, sometimes a musty note that tells you the tank's been sitting too long. It's one of the quickest ways to turn a good setup into a bad start.
Most caravan owners think the problem is just the tank. Sometimes it is. Just as often, the taste or smell is sitting in the lines, the pump strainer, the filler hose, or the hot water side of the system. That's where people get caught. They clean the tank, leave the rest untouched, and wonder why the water still tastes wrong.
A proper caravan water tank cleaner routine isn't just about making the water nicer to drink. It's about keeping the whole water system serviceable, safe, and free from damage caused by rushed or improvised cleaning. In Melbourne workshops, I see the same mistakes repeatedly. Too much bleach. Wrong hose. Cleaner left sitting where it shouldn't. Hot water units exposed to chemicals they were never meant to hold.
If you want the water to taste clean and the plumbing to last, the job has to be done with a bit more care than tipping something into the filler neck and hoping for the best.
That First Cuppa The Taste of Your Adventure
You pull into camp, fill the kettle, and brew the first tea of the trip. The water looks fine, but the taste says otherwise. Plastic, stale water, a faint chemical edge, sometimes a musty smell that gets stronger once it heats up.
That first cuppa is often the earliest warning that the water system needs attention. In the workshop, I see owners blame the tank first, then miss the actual source. Old sanitiser left in a hot water service, biofilm in low-flow pipework, a contaminated filler hose, or residue trapped around the pump can all taint the water long before the tank looks dirty.

Why bad water ruins more than taste
Poor-tasting water changes behaviour fast. Owners stop drinking from the onboard supply, use less from the taps, and let the system sit for longer periods. Stagnation then gives odours, film, and residue more time to build up through the tank, lines, and fittings.
The bigger risk is damage caused by the wrong fix. Strong bleach mixes, mystery cleaners, and long soak times can shorten the life of seals, check valves, tap cartridges, filters, and hot water components. That is why I treat tank cleaning as a whole-system job, not a quick tank rinse.
If your van uses a pressure setup, the pump also needs protecting during any sanitising cycle. A neglected strainer or poor flushing routine can leave taste issues behind and put extra load on the pump. It helps to understand how a 12V caravan water pump works within the plumbing system before you start pushing cleaner through it.
Clean water depends on the full path from the filler point to the tap, including the hot water side, not just the tank under the floor.
What experienced owners learn quickly
Owners with a few seasons behind them stop asking for the harshest cleaner and start asking which product will sanitise the system without attacking the plumbing. That is the right question.
There is always a trade-off. A stronger chemical may shift contamination faster, but it also raises the chance of damaging rubber parts or leaving a taste behind if the flush-out is poor. A milder product is easier on heaters and fittings, but it still needs correct contact time and proper circulation through every branch of the system.
Filtration also plays a part after cleaning, especially if the source water changes from park to park. For owners comparing options, a high-performance boat water filter gives a useful reference point for how fine filtration affects taste and sediment control in compact water systems.
The clean first cuppa comes from method, not guesswork. Measure the chemical properly. Get it through the full system. Protect the heater and fittings. Flush until the water is clean, not just better than before.
Gearing Up Your Cleaning and Safety Toolkit
Before you start, get the gear together. Most bad cleaning jobs go wrong in the first ten minutes because someone guesses the dose, uses the nearest hose, or starts mixing products in an old bucket with no plan.
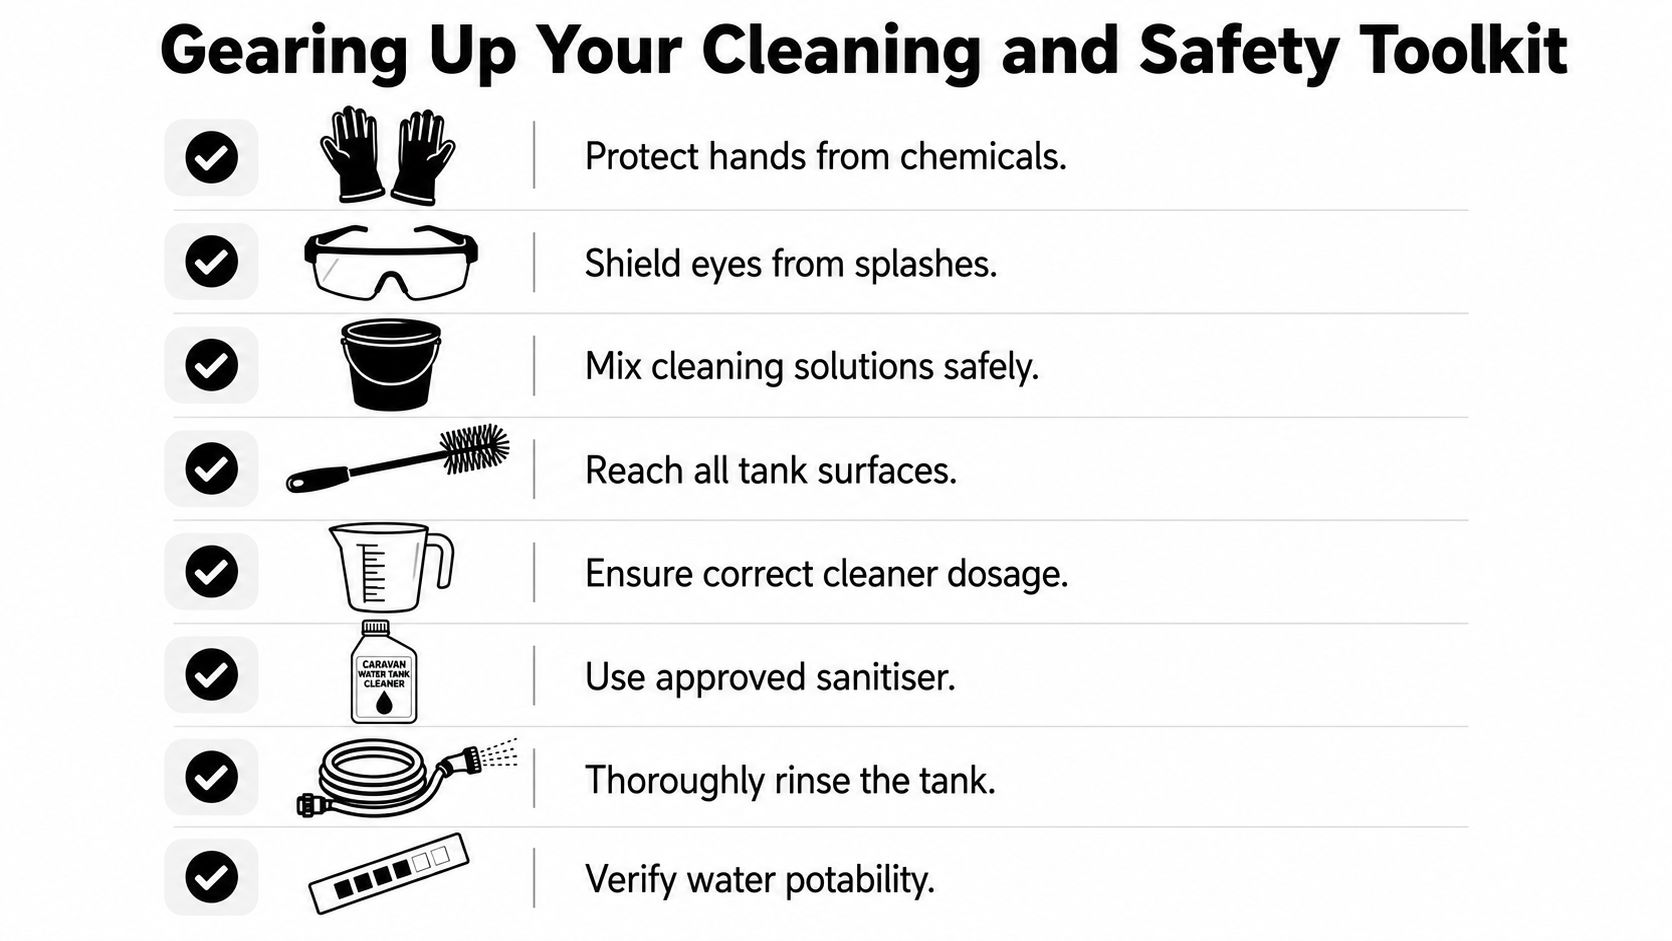
The basic kit that actually matters
You don't need a shed full of gear, but you do need the right gear.
- Rubber gloves: Protect your hands from sanitising solution and old residue coming out of drains and strainers.
- Safety glasses: Splashes happen when you're filling, draining, or working at awkward angles under a van.
- Measuring cup or dosing syringe: This is what stops over-concentrated cleaner from attacking seals and fittings.
- Bucket dedicated to cleaning: Useful for premixing and controlled pouring.
- Long-handled brush if the tank is accessible: Handy for tanks with inspection access and visible residue.
- Potable water hose: This is not the same thing as a standard garden hose.
- Clean rags and a small torch: For checking filler necks, hatch seals, pump strainers, and drain points.
- Water test strips: Good for a final confidence check once flushing is complete.
Cleaner choice is a trade-off
You've got two broad options. A commercial caravan water tank cleaner or a carefully diluted household bleach solution. Commercial products are generally simpler because they're designed for potable water systems and usually come with their own instructions. Bleach is widely available and effective when diluted correctly, but it gives you less margin for error.
In Victoria and Western Australia, health authorities recommend 125 mL of household bleach per 1,000 litres of water for disinfecting caravan water tanks, as outlined in this caravan tank bleach dosage guide. That guidance also states the solution should sit for 24 hours before draining and refilling.
Choosing Your Cleaner Commercial vs. Bleach
| Feature | Commercial Cleaner | Household Bleach |
|---|---|---|
| Ease of use | Usually straightforward if you follow label directions | Works well, but accurate measuring matters |
| System compatibility | Often formulated for potable water systems | Safe only when properly diluted |
| Smell after treatment | Often easier to rinse out | Can leave chlorine smell if flushing is rushed |
| Availability | May require a caravan or marine supplier | Easy to buy locally |
| Risk of user error | Lower if label is followed | Higher if owners guess the dose |
The hose is not a minor detail
A lot of people do a reasonable sanitising job, then undo it with the refill hose. The final refill should be done with a hose designated for potable water. If you want cleaner water beyond tank hygiene, it's also worth understanding how fine filtration works in mobile systems. This overview of a high-performance boat water filter is useful because marine setups deal with many of the same space and water-quality constraints as caravans.
Practical rule: If a hose has spent its life dragging through garden beds or lying in the sun with muddy fittings on each end, don't use it for drinking water.
One more component people forget
Tank cleaning is only part of usable water on the road. If your pump is tired, noisy, or struggling after the system has been cleaned, the issue may be flow and pressure rather than contamination. For owners comparing replacement options, this guide to a 12 V water pump for caravan use is a sensible next read.
The Complete Sanitising and Cleaning Procedure
Start with the van parked safely where you can drain and refill without making a mess. If the system has been sitting, assume the old water is stale and the lines need attention just as much as the tank.
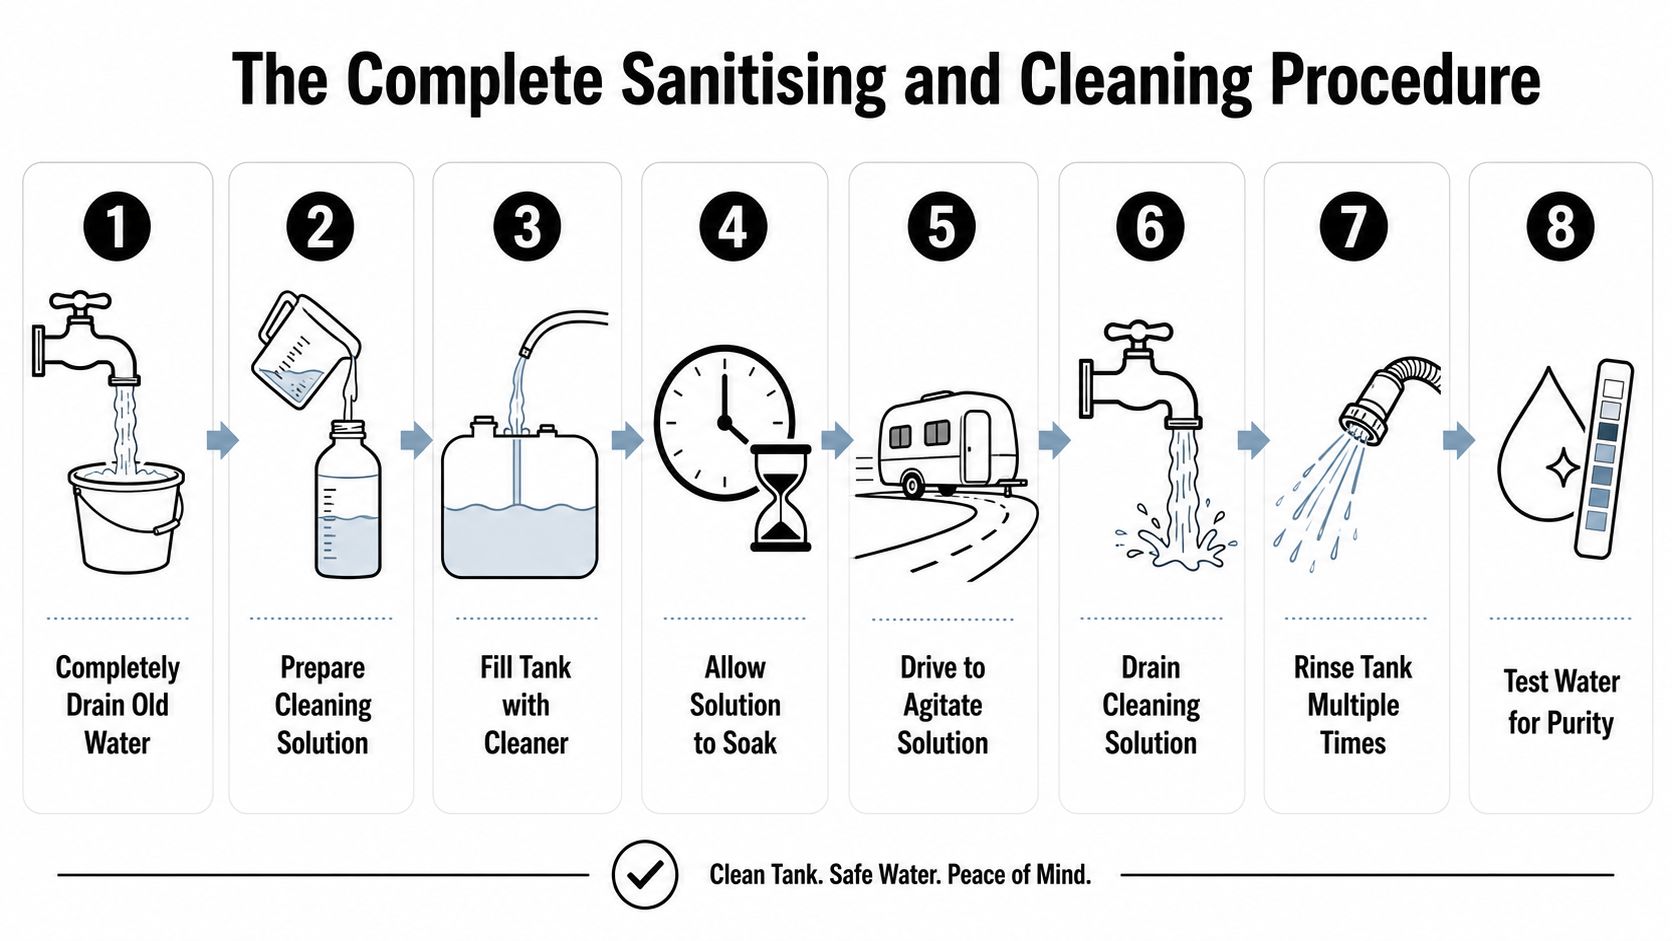
Step one drains more than water
Empty the tank fully. Open drain points, open taps to let air through, and let the system run out as completely as it can. If the van has obvious sediment issues and the tank is accessible, physically inspect before adding cleaner.
Then flush once with fresh potable water. This first pass removes loose material so the sanitiser isn't wasted fighting debris.
Step two prepare the solution correctly
For an Australian caravan water tank sanitising method, one guide specifies 0.4 mL of sodium hypochlorite per 10 L of water and stresses that all taps should be run until the scent is detectable at every outlet, as detailed in this Australian caravan water tank sanitising method. That detail matters because a tank can be sanitised while the pipework remains dirty.
If you're using a commercial caravan water tank cleaner, follow the product directions exactly. Don't combine it with bleach, vinegar, or any home-brew additive. More chemical doesn't mean a cleaner system. It usually means harder rinsing and more risk to components.
Step three protect the hot water side
This is the part many guides gloss over. The fresh water tank, cold lines, hot lines, pump, fittings, and hot water service all belong to one system, but they don't all tolerate chemicals in the same way.
Before circulating sanitiser through the van, identify whether the hot water heater should be isolated or bypassed. If you're unsure, stop and check the unit's requirements. Don't assume every heater, seal, or element will be happy with whatever you pour into the tank.
If the van's layout or heater design means you can't confidently isolate the hot water service, be cautious. Running cleaner through every outlet is important, but so is protecting the heater's internal parts, seals, and any rubber components in the hot loop.
Step four circulate through the plumbing
Fill the tank with the prepared solution. Turn the pump on. Open each tap one by one until the cleaning solution reaches that outlet. Don't rush this. Kitchen tap, vanity tap, shower mixer, external shower, any filtered outlet, and both hot and cold sides where appropriate to your setup.
Often, owners overlook a branch line or an outdoor fitting. Then the van goes away, stagnant water stays trapped in that section, and the smell returns.
A visual walkthrough can help if you prefer seeing the process before doing it yourself.
Step five let it sit long enough
For deep cleaning, a 24-hour soak is the benchmark in Australian caravan tank advice, according to this deep cleaning and refill guidance video reference. Short soaks often leave odour and residue behind because the solution hasn't had enough time to work through film and stagnant areas.
If you're dealing with an older tank that tends to hold sediment in flat sections, light movement can help. Some owners use a careful tow-and-flush approach over uneven ground to agitate what's settled before the final drain. Done sensibly, it can loosen material that static soaking leaves behind.
Step six drain and inspect what comes out
When the soak is finished, drain the system fully. Watch what exits from the drains. If the water is discoloured, carries particles, or smells heavily contaminated, that tells you the cleaner has had something to work on.
At this stage, also check the pump strainer, any inline screens, and tap aerators if fitted. They often catch loosened debris after a sanitising cycle.
Flushing Rinsing and Confirming a Fresh Start
A lot of owners treat flushing like the easy bit at the end. It isn't. A poor flush leaves you with chemical taste, false confidence, or both.
Once the cleaning solution is drained, refill the tank with fresh potable water and run every outlet again until the smell drops away. Then do it again if needed. The point isn't to hit a magic number of rinses. The point is to keep flushing until the system runs clean and odour-free.
Don't use vinegar to fix bleach smell
The bleach-and-vinegar trick keeps floating around caravan forums and campsite chat. It sounds clever because people think vinegar will neutralise the bleach smell quickly. It's not a safe shortcut.
Guidance on caravan tank cleaning warns against this kind of “kitchen chemistry” because bleach and vinegar can react to form chlorinated gases, with flushing recommended instead in this warning on bleach and vinegar mixing in caravan tanks.
If you can still smell cleaner, flush more. Don't start mixing chemicals in a drinking water system.
Refill the right way
The hose you use at the end matters as much as the cleaner you used at the start. The same Australian deep-cleaning guidance that sets a 24-hour soak benchmark also warns that non-compliant hoses can re-contaminate the system, so refill only with a potable-water hose, as noted in the earlier section's linked video reference.
That's the step many owners skip because the tank now “looks sorted”. But recontamination often happens immediately after cleaning, especially if the refill gear lives next to sullage hoses or general camping equipment.
Checks worth doing before the next trip
Before you call the job done, run through a short recommissioning check:
- Smell the water cold: Fill a clear glass and smell before tasting. Cold water reveals leftover odour quickly.
- Check every outlet: One clean tap doesn't mean the whole system is clean.
- Inspect the pump strainer again: Loosened debris can shift after the first full refill.
- Use test strips if you have them: They're useful for reassurance after a full flush.
If you want a better handle on what simple checks can and can't tell you, have a look at this guide on water quality testing. It helps separate guesswork from a basic, practical check.
Troubleshooting Persistent Odours Biofilm and Algae
If the system still smells off after a proper clean, don't automatically assume the cleaner failed. Usually the smell is telling you where the problem still lives.
A sour or stagnant smell often points to water that remained in a branch line, tap body, filter housing, or heater loop. A slimy feel usually suggests biofilm in hoses or pipework. A green tinge or visible residue can indicate algae, particularly after storage or warm-weather exposure.
Match the symptom to the likely fault
Three patterns show up often in caravans:
- Bad smell only at one tap: That usually means a localised issue. Check the aerator, that line, and anything upstream of that outlet.
- Smell across every tap: Look at the tank, refill hose, and circulation step. The system may not have been fully treated.
- Taste returns quickly after cleaning: Suspect the hose, a neglected filter, or old flexible lines that keep holding odour.
Biofilm is the reason quick rinses disappoint
Biofilm is why a van can look clean but still produce poor water. It clings to internal surfaces and doesn't disappear just because the tank got a brief rinse. That's also why mixing random household products is a bad idea. The caravan tank guidance discussed earlier explicitly warns against “kitchen chemistry” and recommends thorough flushing instead of improvised mixing.
If the smell reminds you of broader enclosed-space odour problems, some of the logic in Derek's Auto Detail's odor guide is surprisingly relevant. Track the source, remove contamination physically where possible, then treat the system. Masking a smell isn't the same as removing it.
Odours that come back fast usually mean the source was never removed. It's still sitting in a hose, fitting, heater path, or dead spot in the plumbing.
When to stop repeating the same clean
A second cleaning cycle can make sense if the first job exposed heavy contamination. Repeating the exact same process over and over without inspecting components usually doesn't.
Look closely at these parts:
- Pump strainer and filter housings: They trap loosened residue and can keep feeding smell back into the line.
- Flexible hoses: Older hoses can hold taint and may need replacement rather than another soak.
- Tank interior if accessible: Sediment stuck in corners or low sections may need physical scrubbing.
- Unused outlets: External showers and little-used taps often harbour stagnant water.
If you've cleaned properly, flushed properly, and the issue persists, start thinking component condition rather than cleaner strength. Stronger chemistry won't fix tired rubber, contaminated hoses, or a heater circuit that's holding stale water.
Your Long-Term Maintenance Schedule and Professional Help
You pull the van out after a few months in storage, fill the tank, boil the kettle, and the first cup tells you the system was put away wet. That stale taste rarely comes from the tank alone. It often sits in a heater line, an old hose, a filter housing, or a tap that never got flushed properly.
A good maintenance routine protects the whole water system, not just the tank. That matters in caravans because hot water units, pump strainers, non-return valves, seals, and plastic fittings do not respond well to harsh chemicals or repeated over-cleaning. I see plenty of systems damaged by aggressive DIY treatments that were meant to fix a smell problem.
Build a routine you will actually keep
Set simple checkpoints around how the van is used.
- Before storage: Drain the tank and run the lines down properly. Leaving stale water sitting in the heater circuit, hoses, and low points is what starts many odour problems.
- Before the first trip after storage: Check taste, smell, pump operation, strainer condition, and whether every outlet runs clean, including the shower and any external tap.
- After filling from a doubtful source: Bring the clean forward. Do not wait for the smell to confirm there is a problem.
- During general servicing: Inspect hose clamps, valves, tap aerators, filter housings, and ageing seals. Small faults in these parts can re-contaminate clean water or let air into the system.
Know when DIY stops being smart
If the smell returns soon after a proper clean, stop repeating the same treatment and inspect the system properly. Persistent issues usually point to a trapped contamination source, ageing hose material, residue in the heater path, or fittings that are breaking down internally.
This is also where product choice matters. A poor cleaning method can shorten the life of check valves, rubber seals, mixers, and hot water components. If you are also reviewing filtration as part of a longer-term fix, start with this guide to the best water filter for caravan setups.
Get professional help if you find brittle pipework, weeping joints, repeat odours after correct sanitising, heater isolation issues, or any sign that a fitting may fail when disturbed. Replacing one tired hose or valve early is usually cheaper than chasing taste problems through the whole system or damaging the hot water service.
A clean tank is only part of the job. Reliable water in a caravan comes from keeping the entire plumbing system clean, sealed, and compatible with the products used on it.
If your caravan water system needs more than a routine clean, Ring Hot Water can help with genuine parts, caravan water components, filtration gear, fittings, and practical advice from a Melbourne team that understands hot water units, plumbing protection, and reliable drinking water setups.

