Uncategorized
Under Sink Boiling Water Unit Installation: Your 2026 Guide
Jun
You're probably reading this with a kettle on, half-watching it while trying to get through breakfast, pack lunches, or answer emails before the day properly starts. That delay is exactly why under-sink boiling taps have become such a common upgrade in Melbourne kitchens. They clear the bench, cut out the kettle shuffle, and make the kitchen feel more organised straight away.
There's also a practical side to it beyond convenience. Point-of-use hot water puts the heat source right where you need it. Australia's water efficiency guidance notes that point-of-use systems can reduce wait time for hot water at the tap, and by placing the heater directly under the sink, you avoid long pipe runs and the draw-off waste that happens while waiting for hot water to arrive, affecting both water and energy use, as outlined in the hot water distribution guidance. In a Melbourne renovation, that matters because under-bench space is rarely generous, and every fitting under the sink has to justify its place.
The End of the Kettle An Introduction
A good under sink boiling water unit installation changes how a kitchen works day to day. Tea is instant. Pasta water starts faster. Sterilising a chopping board or rinsing greasy cookware becomes easier. It's one of those upgrades that sounds indulgent until you live with it.
The other reason these systems suit Australian kitchens is that they fit the broader way people now think about renovations. Since 2005, the mandatory Water Efficiency Labelling and Standards scheme has helped make labelled kitchen fixtures part of normal purchasing and renovation decisions in Australia, which has pushed homeowners and installers to think about appliance footprint, fixture compatibility and compliance together, not as separate decisions, as discussed in this boiling water tap installation guide.
That's why the old approach of buying the tap first and figuring out the cupboard later often goes badly. The manual might show a neat empty cabinet. Real Melbourne kitchens usually have a trap offset to one side, an old stop tap that barely turns, a power point in the wrong spot, or cleaning products already fighting for room.
A boiling unit works best when the cabinet, plumbing and power have been planned as one small system.
For plenty of households, replacing the kettle isn't just about speed. It's about getting bench space back and making the kitchen easier to use. If you're weighing up that swap, this guide on replacing your kettle with a tap is a useful starting point before you commit to the installation side.
Pre-Installation Checks for Your Melbourne Kitchen
Most failed installs don't fail because the unit is poor. They fail because the cabinet wasn't measured properly, the plumbing didn't suit the supplied fittings, or there was no sensible way to service the unit after it went in.
That's especially common in Melbourne homes. Older weatherboards, compact apartments, and quick cosmetic renos often leave you with under-sink spaces that look usable until you try to fit a tank, hoses, isolation valve and power lead in the same cavity.
Measure for service space, not just fit
A unit that physically squeezes in isn't necessarily installable. You need room for the body of the boiler, the hoses to sweep naturally without crimping, access to the power point, and enough clearance to reach a valve later without removing half the cabinet contents.
Installation guidance often focuses on measuring the cavity, but it frequently misses the Australian reality that a tight cabinet also has to remain serviceable. It also notes that installers often need adapters for non-standard connections such as G 1/2" male cold and hot fittings, which is a regular issue in Australian renovations with older homes and compact apartments, as shown in this installation video reference.
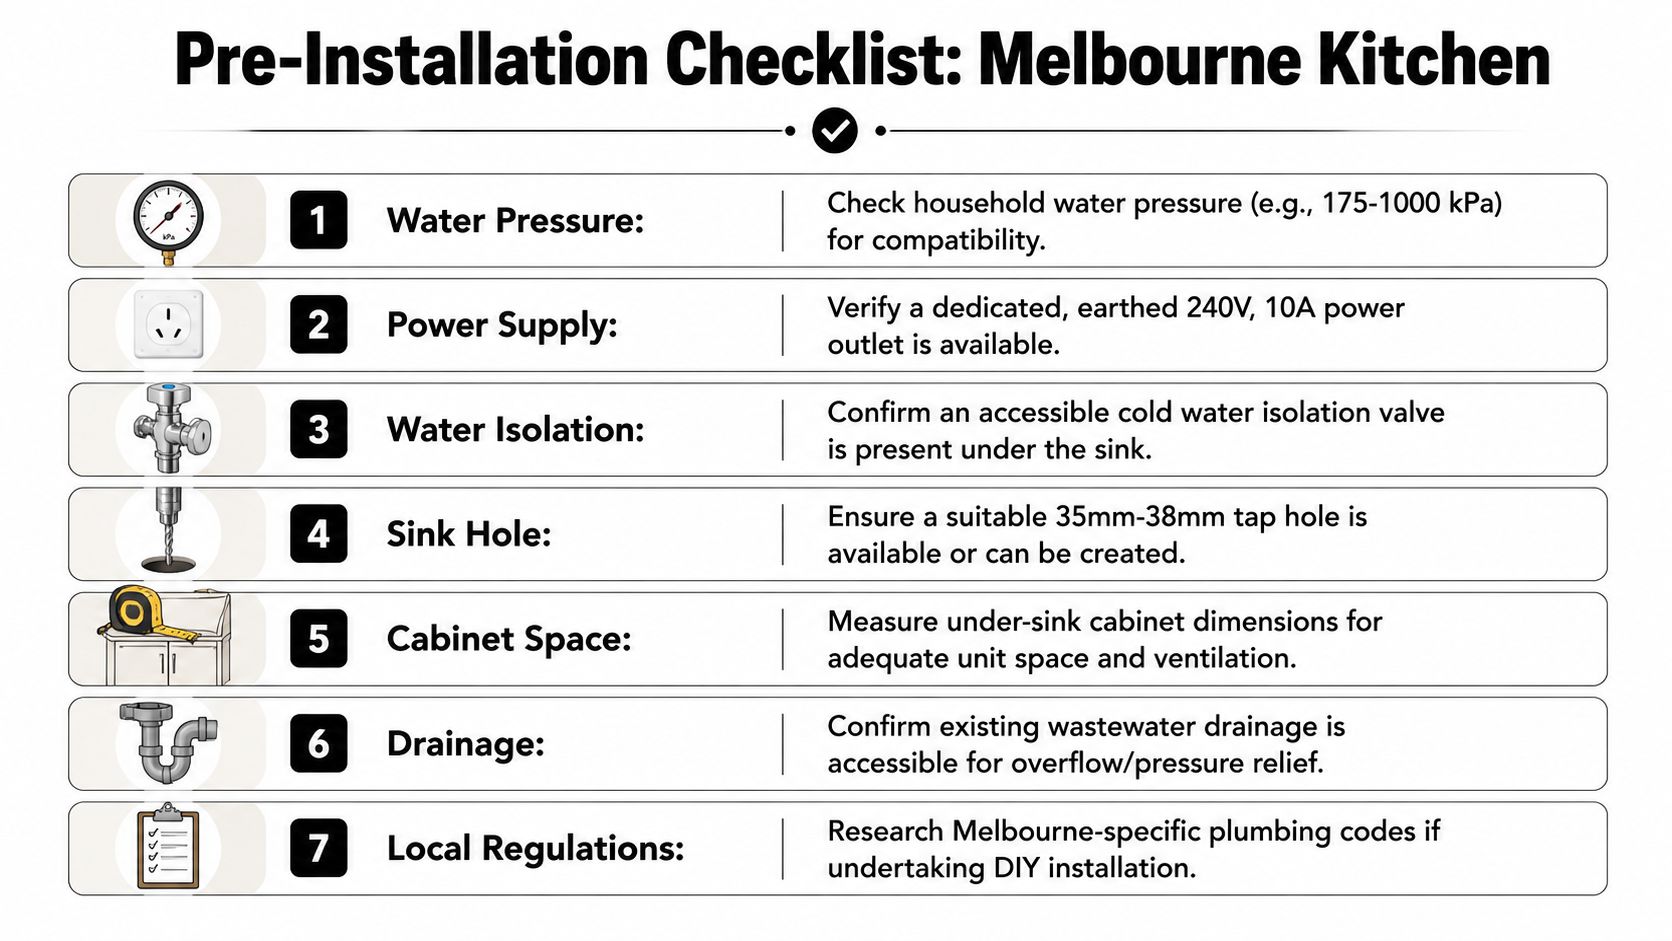
What to check before you buy anything
- Cabinet width and depth: Measure around existing pipework, not just the empty-looking front opening.
- Door swing and hinge position: Some tanks fit the cabinet but clash with hinge hardware or internal shelves.
- Power access: The unit needs a nearby grounded outlet. If there isn't one, that's electrician territory.
- Cold feed location: Check where the cold line enters and whether there's already a usable isolation valve.
- Tap hole position: Make sure the boiling tap can sit where the handles or levers won't foul the splashback or sink edge.
- Waste and overflow route: Some setups need a sensible path for discharge or related plumbing accessories.
- Future access: If you can't get a hand onto the valve or filter later, the install hasn't been planned properly.
Melbourne quirks that catch DIYers out
In new kitchens, the rough-in is usually cleaner. In existing kitchens, the sink cabinet often has a mix of old braided hoses, retrofitted mixers and badly positioned traps. That's where people discover the supplied kit isn't enough.
A simple but worthwhile check is whether your cold isolation valve works. If it doesn't shut off cleanly, replace it before you add anything else under the sink. If you're not sure what you're looking at, this guide to an under-sink shut-off valve will help you identify what should be there.
Practical rule: If you need to force a hose into place to make the unit fit, the cabinet isn't ready for the unit.
Gathering Your Tools and Materials
A clean install starts before the first fitting is undone. Get everything on hand first, because stopping midway to hunt for an adapter usually means you'll reassemble something in a rush, and that's when threads get crossed or olives get crushed.
Tools that actually help under a sink
You don't need a van full of gear, but you do need the right few tools.
- Adjustable spanners: One to hold, one to turn. That stops strain from twisting into valves or soft pipework.
- Basin wrench: Handy when the tap nut is tucked behind the bowl where normal spanners barely move.
- Tube cutter: Gives a cleaner result than attacking copper with a hacksaw in a tight cupboard.
- Screwdrivers and nut drivers: Most mounting brackets and clips are simple, but awkwardly placed.
- Torch or headlamp: Under-sink work is mostly done in shadow.
- Bucket and towels: Even a careful isolation leaves residual water in the line.
Materials worth choosing properly
Many DIY jobs often go off track. This happens when people reuse old flexible hoses, rely on tired valves, or grab whatever adapter fits loosely enough to start threading.
A better approach is to lay out the plumbing path before starting:
- Isolation valve on the cold feed: Makes later servicing far easier.
- Correct tees and adapters: Match them to the actual plumbing under your sink, not to what the product box assumes.
- PTFE tape for threaded joints: Use it on threaded connections where the fitting type calls for it.
- Quality hoses or tubing: Don't bend a line tighter than it wants to go.
- Mounting hardware: Use what the manufacturer supplies unless there's a clear reason to change it.
If you need replacement valves, fittings, hoses or John Guest-style and brass threaded parts, Ring Hot Water's parts range is one local option alongside standard plumbing suppliers.
Cheap fittings usually don't fail immediately. They fail after you've packed the cupboard, shut the door and assumed the job's done.
The Core Installation Plumbing and Electrical
The most reliable sequence is simple. Verify cabinet clearance and electrical access first, isolate the water, mount the boiler level, connect the cold feed and hot outlet, then restore power. Skipping the pre-fit check is one of the main causes of kinked tubing and leak-prone connections, according to this under-sink heater installation method.
Start with the cabinet completely empty. Don't work around detergent bottles, bins or stacked chopping boards. You need to see every fitting and you need space to move.
A clear visual helps before you get into the details.
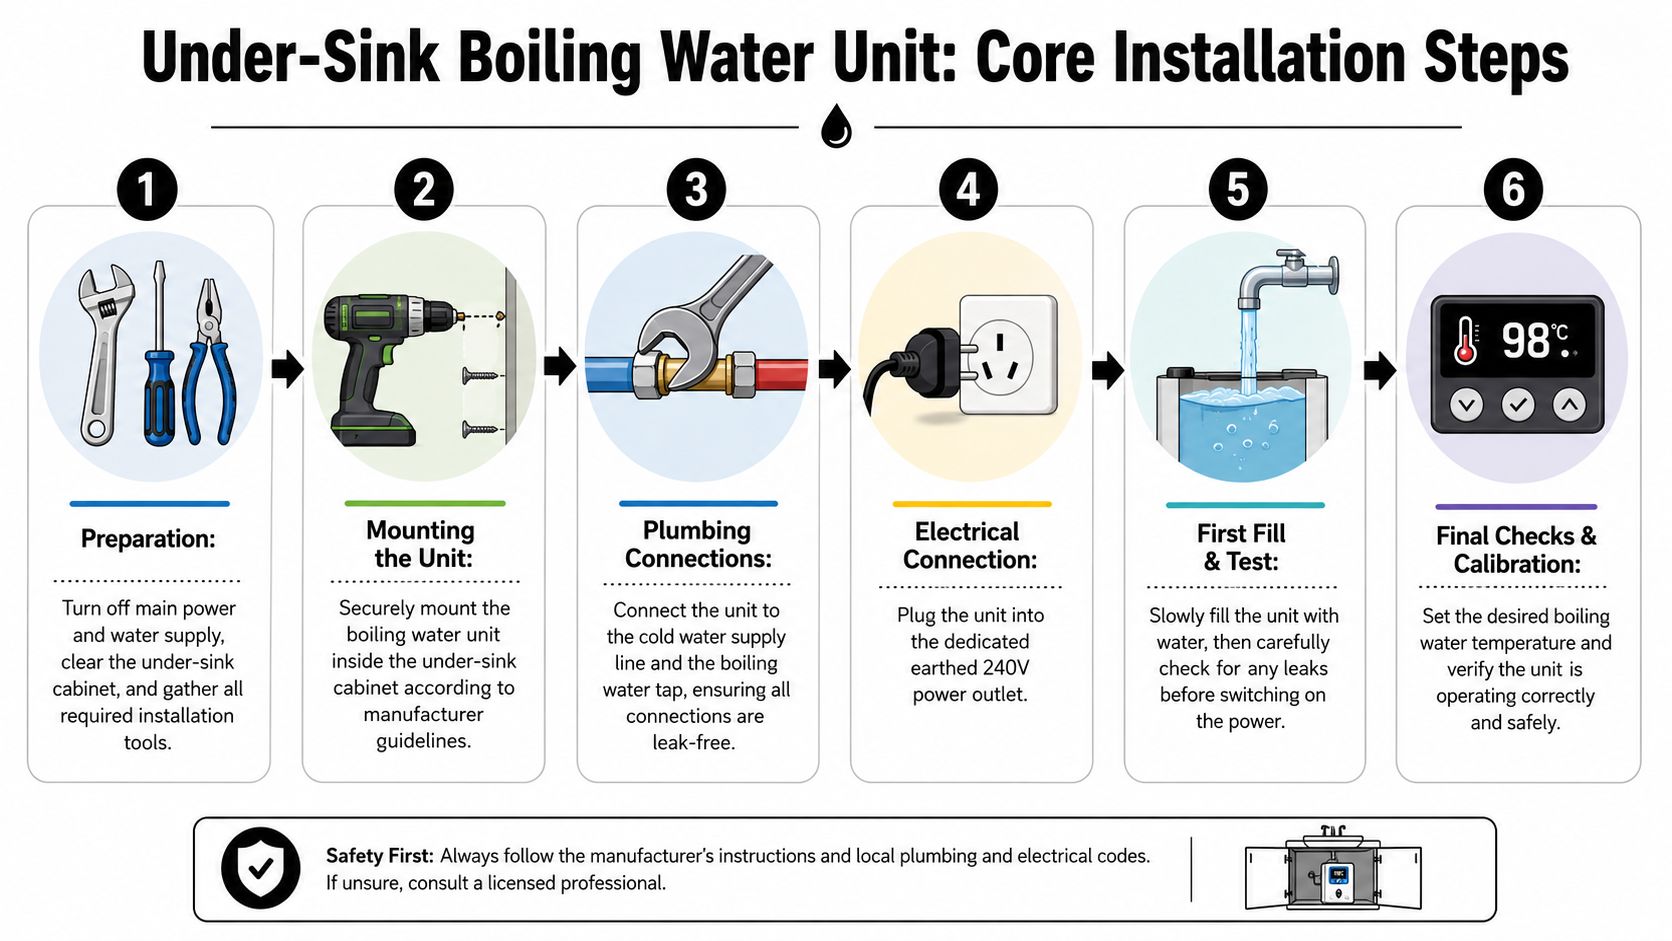
Phase one with water off and layout confirmed
Shut off the cold water supply properly. If there's a local valve under the sink and it works cleanly, use that. If not, isolate the property supply before touching anything. Open the regular tap above to release pressure and catch residual water in a bucket.
Dry-fit the tap before fixing anything permanently. Check handle or lever clearance, reach over the sink bowl, and how the hoses will drop below the benchtop. If the tap tails or tubes have to bend sharply the moment they enter the cabinet, change the plan now.
Mount the tap and unit without strain
Secure the tap first if the manufacturer's sequence calls for it, then position the under-sink unit. Keep it level. Leave enough room around it for tubing to run cleanly and for later servicing.
If the unit mounts to the cabinet wall, check the substrate. Thin cabinet backs sometimes need reinforcing. A solid mounting point matters because a tank full of hot water has weight, and movement over time puts stress on connections.
If the tank can only fit hard against the trap, against the side wall, or jammed under a shelf, stop and rethink the layout before making any final connections.
This short video gives a useful visual reference for the overall process and cabinet layout logic.
Make the plumbing connections carefully
Connect the cold feed to the unit and the unit outlet to the tap exactly as the product requires. Keep the tubing path smooth. Don't twist hoses to make them line up. Reposition the unit if you need to.
Where threaded joints are part of the setup, use PTFE tape if that fitting type requires it. Where compression fittings are used, tighten them firmly but don't lean on them like you're sealing a mains pipe in a plant room. Overtightening can deform sealing surfaces. Undertightening can leave a slow drip that only shows once the unit has filled and warmed.
A pressure limiting valve may also be required depending on the unit and supply conditions. If the product specification or warranty calls for one, fit it correctly rather than treating it as optional. This guide to a pressure limiting valve for boiling systems explains where it fits into the setup.
Electrical connection needs a hard line between DIY and licensed work
If the unit is designed to plug into an existing nearby grounded outlet, plugging it in is straightforward after the plumbing side is filled and checked.
If there is no suitable outlet, or you need new wiring, circuit changes or relocation of the power point, that isn't a DIY add-on. It needs a licensed electrician.
Safety note: Never energise a boiling unit before it has filled properly. Dry heating can damage the unit.
A good rule is this. Plumbing mistakes usually show up as leaks. Electrical mistakes can be far more serious. Keep those boundaries clear.
Before power goes on
Run through this quick check:
- Cold supply isolated and re-opened in a controlled way
- Tap body secure and aligned
- Unit level and stable
- No pinched or kinked tubes
- All joints dry before pressurising
- Outlet accessible, not buried behind the unit
If any one of those is off, fix it before the first fill.
Commissioning Testing and Common Problems
The installation isn't finished when the last fitting is tightened. The first fill and test are where bad joints, trapped air and connection mistakes show themselves.
First fill done the right way
Open the water supply slowly. Then open the boiling or hot side as required by the unit's instructions and let the tank fill completely before switching the unit on. A solid, continuous flow from the spout tells you the tank has filled and air has moved through the system.
Walk every joint with a dry hand or paper towel. Don't just look from the cabinet door. Reach behind the valve, the tee, the tank ports and the tap tails. Slow leaks often hide on the underside of fittings.
A joint can look dry from the front and still be weeping from the back.
Once you're satisfied the unit is full and leak-free, restore power and allow it to heat. Some harmless noises during first heat-up can be part of normal operation, but repeated dripping, obvious strain on hoses or an erratic flow at the tap means you need to stop and re-check the setup.
Common installation problems and fixes
| Problem | Likely Cause | Solution |
|---|---|---|
| No water from the tap | Isolation valve still closed, supply line not opened fully, or tank not filling correctly | Check the cold feed valve, reopen supply slowly, and confirm the fill procedure has been followed |
| Water flows but doesn't heat | Unit not powered, power switched on too early, or electrical supply issue | Confirm the unit is plugged into a suitable live outlet and that the tank was filled before energising |
| Slow drip at a fitting | Compression fitting overtightened or threaded joint not sealed correctly | Isolate water, remake the joint carefully, and remove any strain from the hose or pipe |
| Kinked tubing | Unit placed too close to the tap tails or cabinet wall | Reposition the unit and reroute the tubing with a smoother bend |
| Spluttering or uneven flow | Air still clearing from the tank or line | Continue the fill and purge process until flow is steady |
| Cabinet is too crowded to service | Unit was fitted for minimum clearance only | Rework the layout now, not at filter-change time |
What not to ignore
Three things deserve immediate attention. Water around electrical components. A cabinet door that presses on tubing. A unit that had to be forced into position to make the connections reach.
Any one of those can turn a neat DIY project into a leak repair.
When to Call a Professional in Melbourne
Some jobs sit comfortably within capable DIY territory. Others don't. Under sink boiling water unit installation crosses into professional work as soon as the power setup isn't already suitable, the valve arrangement needs rebuilding, or the cabinet layout needs rerouting to make the unit fit safely.
In Melbourne, the call to bring in a plumber is usually the right one when the existing sink cabinet is old, cramped or full of mixed fittings from earlier renovations. The same applies if the cold isolation valve won't shut, the tap hole has to be created in stone, or the unit needs discharge plumbing that isn't already straightforward.
A professional installation also makes more sense when warranty conditions are strict. Many unit problems start with basic setup issues such as strain on hoses, poor pressure control, inaccessible service valves or a tank that was energised before being filled. Those are all avoidable, but only if the installer knows what to look for.
If you're looking at the cupboard and already thinking “this is tighter than the manual suggests”, trust that instinct. That's usually the point where a local specialist saves time, prevents leaks and leaves you with a unit that can still be serviced later.
Frequently Asked Questions
Can I install one myself?
If there's already a suitable grounded outlet, workable cabinet space and a straightforward cold feed with a usable isolation valve, a capable DIYer can handle some installations. If power has to be altered or the plumbing is messy, call licensed trades.
Will any boiling tap work with any under-sink unit?
No. Tap and tank systems are often designed as matched assemblies. Mixing brands can create problems with hose connections, control functions, pressure requirements and warranty support. Check the manufacturer's compatibility before buying.
What usually causes leaks after installation?
The most common causes are strained tubing, overtightened compression fittings, under-tightened threaded joints, and skipping the dry-fit stage. Most of those issues start before the water is turned back on.
How often do filters or service parts need changing?
That depends on the specific unit, filter type and water conditions. Some systems have straightforward scheduled servicing, while others vary by usage and manufacturer guidance. Follow the product manual rather than guessing.
How much does professional installation cost in Melbourne?
It varies with the cabinet layout, the condition of the existing plumbing, whether an electrician is needed, and whether extra valves or fittings have to be added. A simple swap into a prepared cabinet is a different job from retrofitting an older kitchen, so it's best priced after someone sees the setup.
Do these units suit small kitchens?
Often, yes. They can free up bench space by removing the kettle, but the under-sink cabinet has to be assessed properly. In compact kitchens, fit and service access matter more than the brochure dimensions.
If you want a second opinion before buying, or you'd rather have the installation handled properly from the start, Ring Hot Water can help with Melbourne under-sink boiling water unit installs, parts, servicing and practical advice on what will fit your cabinet.
