Uncategorized
How Do I Install an Under-sink Boiling Water Unit in Australia
Jun
You're probably looking at a crowded sink cabinet, a kettle hogging bench space, and a product box that makes the job look easier than it really is. That's how most under-sink boiling water projects start. The appeal is obvious. Turn a handle and get near-boiling water on demand, without the kettle, the wait, or the cord draped across the splashback.
In an Australian kitchen, though, this isn't just another appliance swap. An under-sink boiling water unit connects to fixed plumbing, runs at high temperature, and sits inside cabinetry where small mistakes can turn into leaks, dry-fired elements, or warranty trouble. The question isn't only how do I install an under-sink boiling water unit in Australia. The core question is how to install one safely, legally, and without giving your insurer or manufacturer a reason to walk away.
The End of the Kettle An Introduction to Under-Sink Boiling Water
It usually starts on a busy weekday morning. The kettle is in the way, the bench is cluttered, and someone wants tea, someone else wants porridge, and the power point is already doing too much. An under-sink boiling water unit fixes that bench-top mess by shifting the working parts into the cabinet and leaving a dedicated tap above the sink.
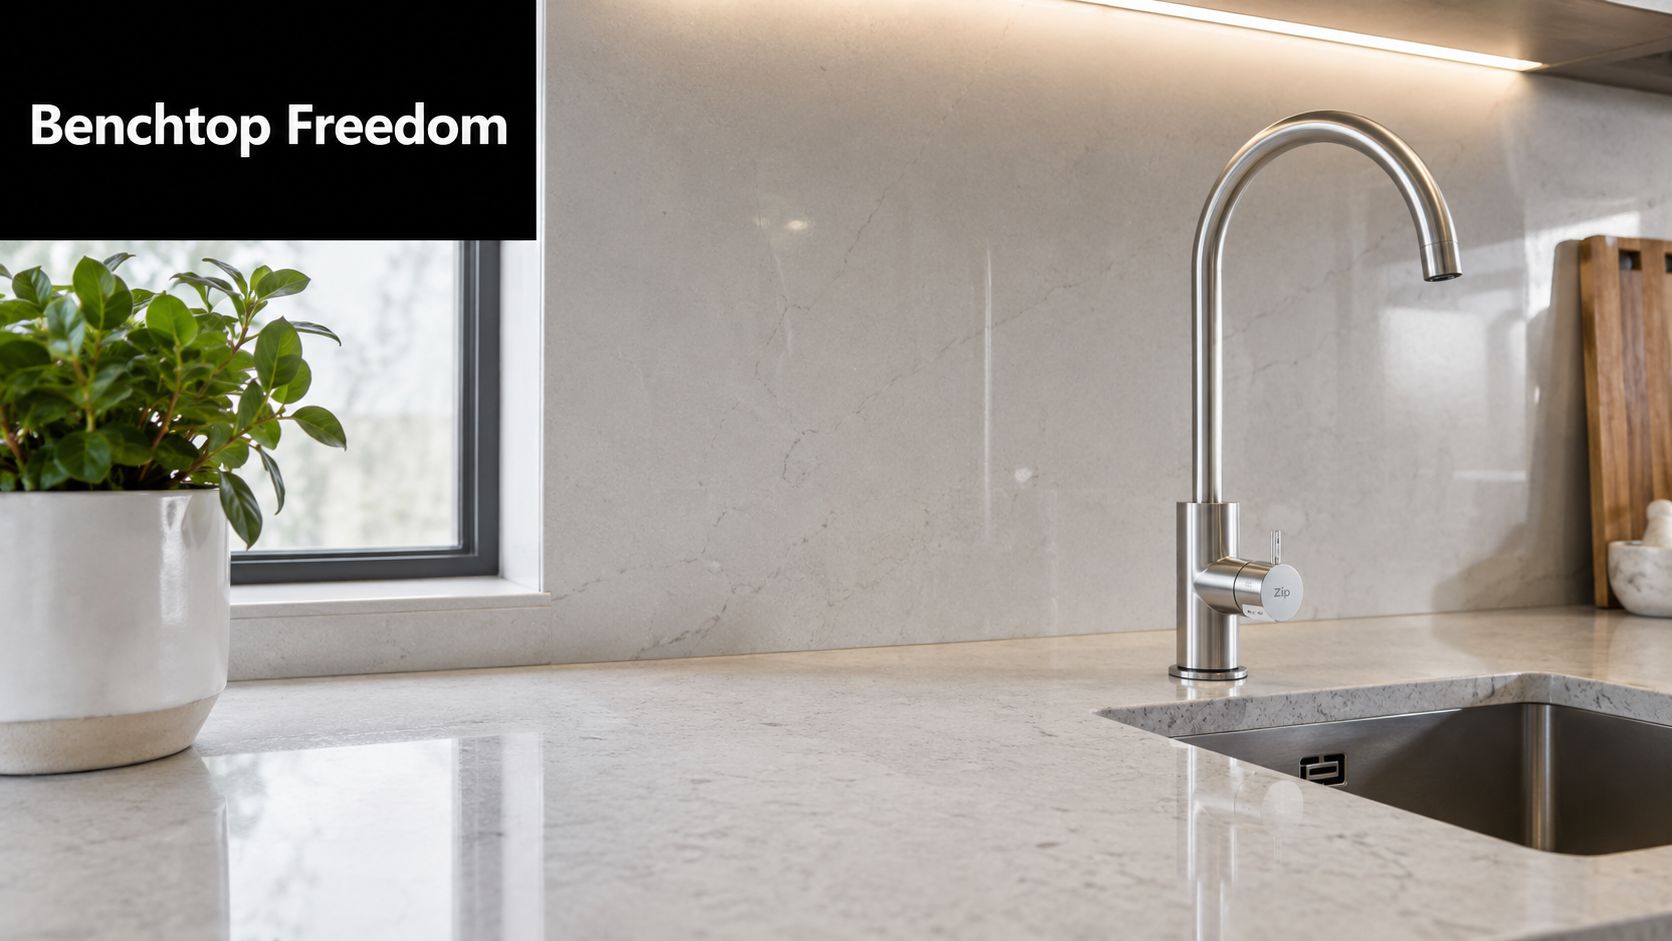
That convenience is what sells these systems. The part many homeowners miss is that they are tied into fixed plumbing and high-temperature water delivery inside a timber cabinet. In Australian homes, that brings legal and practical consequences. If the unit is installed the wrong way, you are not only dealing with leaks or scald risks. You can also end up outside the manufacturer's warranty, outside plumbing rules, and in a poor position if there is ever an insurance claim.
If you are still weighing up the practical upside, this guide on the benefits of a boiling water tap for your home gives a useful overview of where these systems suit everyday use.
What makes these units different
A boiling water tap is more involved than a standard mixer because it relies on a storage tank, safety controls, pipe connections, and, in many cases, filtration. It also has to be installed so the unit can vent heat properly and be serviced later without pulling half the cabinet apart.
The trade-off is straightforward. You get speed, convenience, and a tidier kitchen. You also take on a setup that has tighter installation requirements than a plug-in appliance.
A proper install needs to allow for:
- Cabinet fit: Enough room for the tank, filter, hoses, valves, and airflow around the unit.
- Service access: Clear access for filter changes, isolation, maintenance, and future replacement.
- Heat management: Safe placement away from stored items that should not sit against a hot unit.
- Legal connections: Plumbing work that complies with Australian requirements and the product's installation instructions.
That last point is the one many online tutorials gloss over. Some preparation work is manageable for a capable homeowner, such as checking cabinet dimensions or clearing the space. The plumbing connection itself is a different category. In Australia, that is where compliance, WaterMark-related product requirements, and warranty conditions start to matter in a very real way.
A neat finish on the benchtop does not prove the system was installed properly. What matters is whether the unit is connected, commissioned, and documented in a way that will hold up if there is a fault later.
Pre-Installation Checklist What You Need Before You Start
Most bad installs don't go wrong at the final connection. They go wrong earlier, when someone buys the wrong fittings, skips filtration, underestimates cabinet space, or assumes any boiling unit sold online will suit Australian plumbing.
Check the product before you check the cupboard
Start with the unit itself. In Australia, WaterMark certification is mandatory for all boiling water units, and compliant units have reduced product failures and safety hazards by over 75% since full implementation, as noted in this Ring Hot Water article on the best under-sink hot water system for an Australian kitchen. If the unit doesn't carry the correct certification, stop there.
That one check affects safety, warranty position, and whether the unit should be connected at all. It also ties into AS/NZS 4020 requirements around safety and performance.
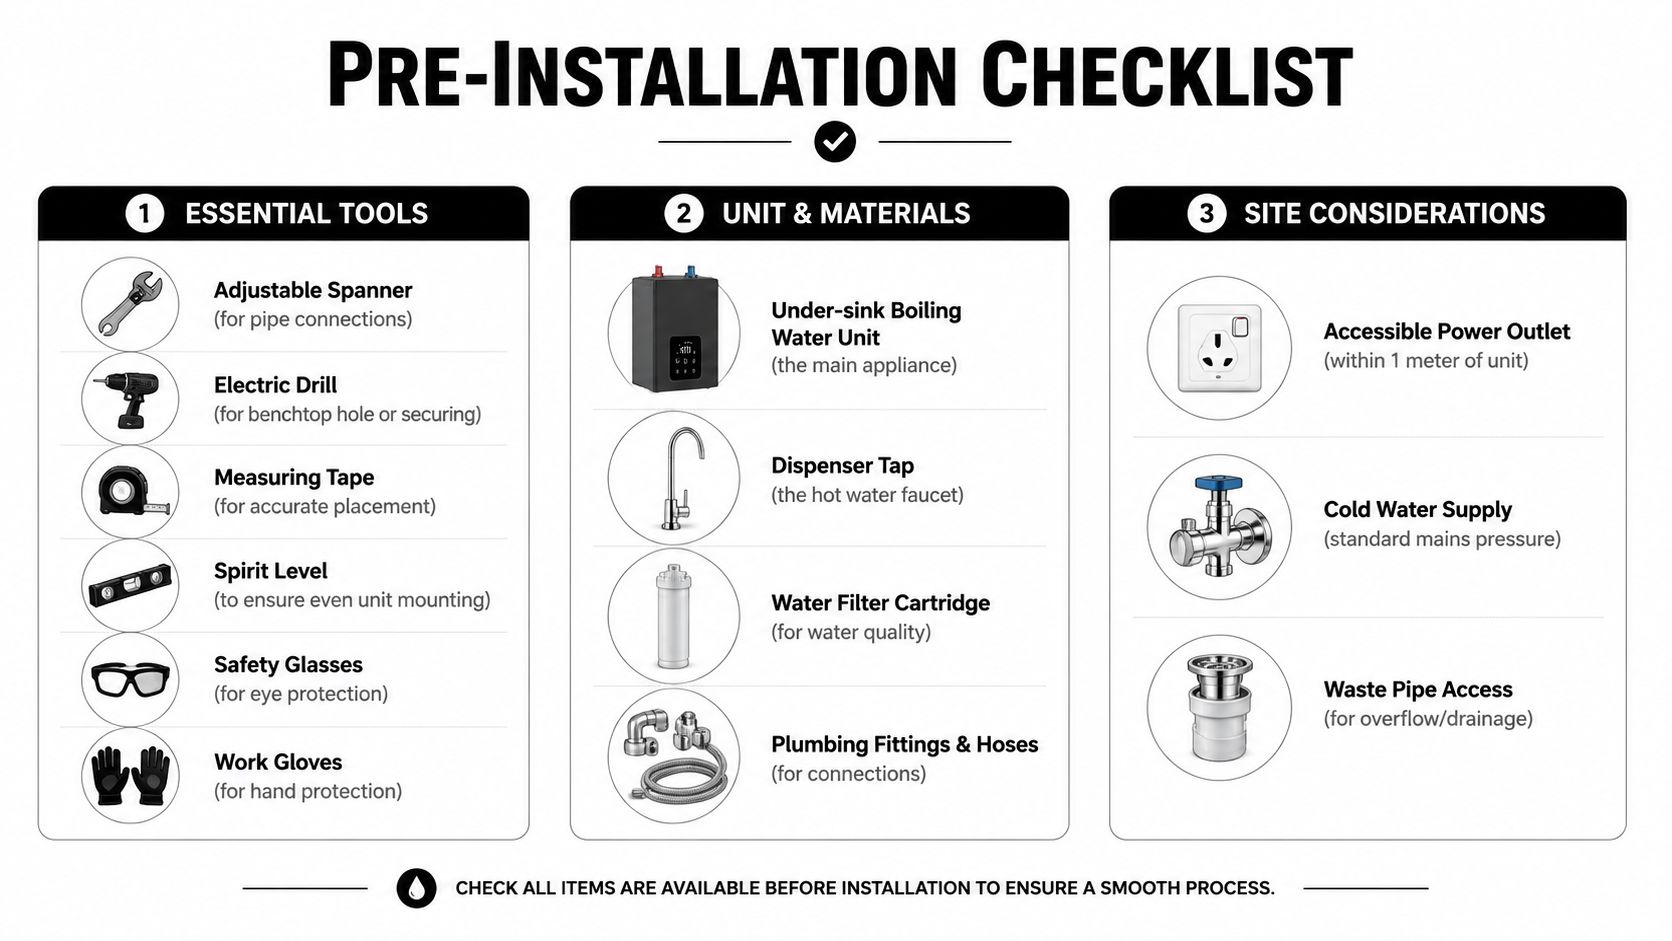
Tools and site basics
You don't need a van full of gear to prepare properly, but you do need the basics ready before anyone touches the plumbing.
- Hand tools: Adjustable spanner, screwdrivers, drill, hole saw if required by the tap, measuring tape, spirit level.
- Protection gear: Gloves, eye protection, old towels, and a bucket for residual water.
- Connection materials: PTFE tape for threaded joints, compatible brass fittings, and the correct tubing supplied or approved by the manufacturer.
- Isolation point: Make sure you know where the local shut-off is. If the existing under-sink valve is old, seized, or unreliable, deal with that first. A proper shut-off valve makes maintenance and emergency isolation much easier later.
Cabinet fit matters more than people think
Measure the under-sink space with the doors closed and the waste in place. Don't measure an empty cabinet in your head and assume it'll work once the bin system, detergent, traps, and shelves are back.
Look for:
- Enough height and footprint for the boiler tank to sit upright and level
- Clear routing paths for hoses without sharp bends
- Access to the serviceable parts such as filter heads, valves, and power cord
- Ventilation space required by the manufacturer
- A suitable existing power point within reach of the unit cord
If the only way to make the unit fit is to cram hoses behind the tank or wedge the boiler around the trap, the layout isn't ready yet.
Don't skip the water quality check
In Melbourne, filtration isn't an optional extra on many installs. Hard water drives scale, and scale shortens the life of boiling systems fast. The Australian Water Quality Association reports that 70% of boiler element failures in the AU region stem from scaling caused by unfiltered hard water, and skipping pre-filtration in hard water areas like Melbourne can reduce boiler lifespan by up to 50%.
That's why many units should be paired with a suitable inline filter, especially where the manufacturer calls for one to protect the element and preserve warranty conditions.
The specific Australian fit-out details
Some practical details catch people out:
- Connector compatibility: The cold feed and domestic hot lines in the Australian market commonly require 1/2-inch Male BSP to 6mm Push Fit connectors.
- Threaded joints: Use PTFE tape correctly and don't overtighten brass fittings.
- Pressure-related accessories: Some installations require pressure limiting or backflow protection depending on the unit and site conditions.
If you sort these details before the unit comes out of the box, the install becomes cleaner, faster, and much less risky.
Your Guide to a Safe and Compliant Installation
The physical install has two parts that have to work together. The tap above the bench must sit square, secure, and in the right spot for daily use. The boiler below must be level, accessible, and connected with smooth hose runs that don't fight the cabinet layout.
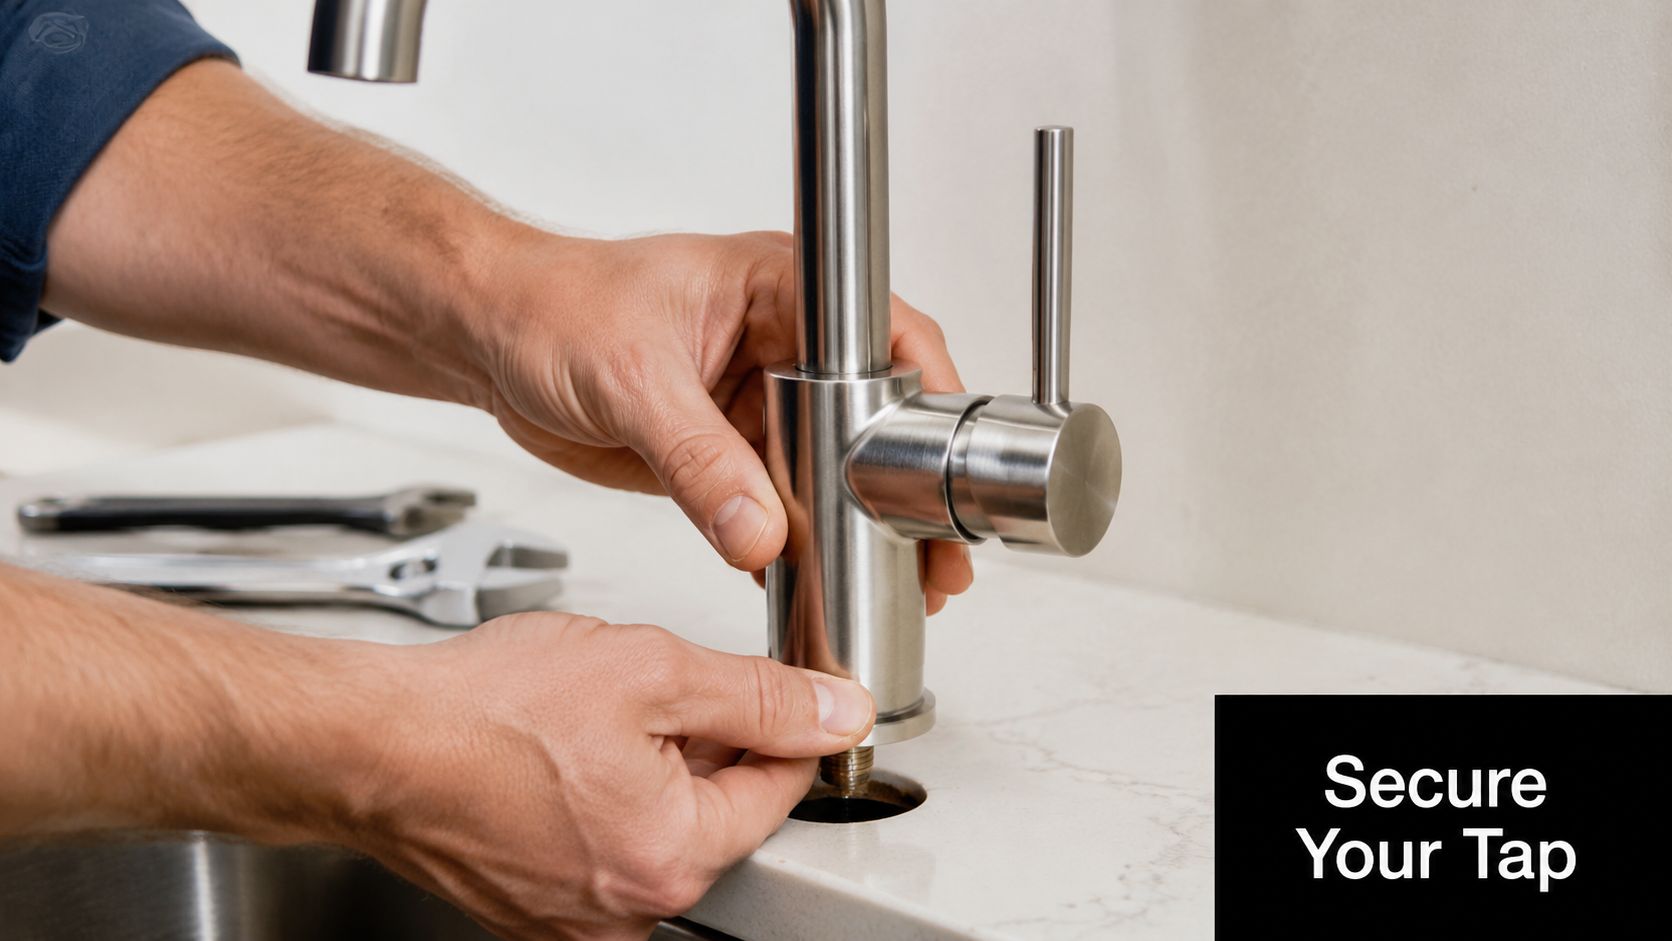
Position the tap properly
If the benchtop already has a suitable hole, confirm the diameter and clearance match the tap shank and fixing hardware. If not, the hole needs to be drilled accurately and in the right location for both use above and hose routing below.
The tap shouldn't end up hard against the splashback, crashing into a window, or forcing the silicone hose into a twist under the bench. Secure the body firmly, but keep its orientation aligned with the boiler outlet path underneath.
Practical rule: Align the tap so the hose run rises naturally. Don't force a loop, twist, or sideways bend just to make the cabinet look tidier.
If the unit is going into a broader renovation, it's worth looking at this expert kitchen renovation advice from Templeton Built. Tap location, sink choice, waste position, and cabinet internals all affect how well an under-sink boiler fits in practice.
Mount the boiler where it can be serviced
The tank must sit upright, stable, and level. Don't perch it on an uneven cabinet floor or wedge it behind other services. Under the National Construction Code expectations referenced in trade practice, the outlet and serviceable parts need to remain accessible. If someone has to dismantle half the cupboard to get to the unit later, the job was badly planned.
A good layout keeps the boiler clear of:
- Waste traps and moving bins
- Stored household chemicals
- Cabinet screws or brackets that can rub through tubing
- Heat-sensitive items pressed against the unit
Route the hoses without stress
A significant number of installations fail, with service-provider data showing that 40% of installation failures come from kinked tubes or pinched joints that restrict flow and contribute to tank over-pressurisation. Smooth routing and a level-mounted unit are critical for reliability.
Use broad curves, not sharp bends. Keep silicone and plastic tubing away from cabinet edges, hinge arms, and screw tips. If a hose wants to spring into a kink, change the layout or reposition the unit. Don't force it and hope for the best.
A dry cabinet at the joint line before pressurisation is the standard to aim for. If you can already see moisture or stress at a fitting, fix it before filling the tank.
Make the water-side connections in the correct order
The exact sequence depends on the brand, but the logic stays the same. The cold supply feeds the isolation point, then any required valve or filter, then the boiler inlet. From the boiler, the designated outlet lines run to the tap.
Key connection points usually include:
Cold feed in: mains cold water to isolation valve, then to filter or approved inlet fitting
Boiler inlet: filtered or conditioned cold supply into the boiler tank connection specified by the manufacturer
Tap lines: the correct outlet hoses from boiler to tap, kept untwisted and unsupported by tension
Later in the process, it can help to watch the physical sequence in action:
Use the supplied or approved John Guest and brass threaded fittings where specified. Tighten compression fittings firmly, but don't lean on them. Excess force can distort the ferrule and create the very leak you were trying to prevent.
Electrical Connections and Commissioning the Unit
A lot of otherwise decent installs are ruined at first power-up. The plumbing looks neat, the tap is straight, and then someone plugs the unit in before the tank is fully primed. That's when a new element gets cooked in minutes.
Plug-in only means plug-in only
An under-sink boiling unit should be connected to an existing, suitable, properly earthed power point. If there's no appropriate outlet in the cabinet or nearby, that's an electrician's job. Don't hardwire the unit yourself. Don't run a rough extension lead into the cupboard as a permanent fix. Don't adapt the electrical side to suit the product.
Keep the cord path clear of hot surfaces, wet areas, and sharp cabinet edges.
Prime before power
This is the commissioning step that matters most. The boiler tank must be filled to displace air before the unit is energised. The normal process is to open the water supply in a controlled way and run water through the system until there is a continuous flow from the spout.
The priming process should take about 90 seconds, and failing to prime before applying power results in a 100% likelihood of dry fire failure. It's also noted as a common pitfall in 30% of DIY installations.
Follow a disciplined sequence:
- Open the isolation valve slowly and let the supply enter the system.
- Operate the tap so water begins filling the boiler and purging air.
- Wait for continuous flow from the spout. Not spurting. Not coughing air. Continuous flow.
- Check every joint while the system is filling.
- Only then plug the unit in.
If the spout is still spluttering with air, the tank isn't ready for power.
First heat-up and final checks
Once primed and powered, the unit typically needs a 15-minute heat-up cycle to reach 98°C. During that period, keep the cupboard open and keep watching. A slow weep at a fitting can take time to show itself.
Check for:
- Leaks at threaded and push-fit joints
- Hose movement as pressure stabilises
- Unusual noise that suggests trapped air
- Correct tap operation after the first heat-up
If the unit doesn't heat properly after a correct fill and power-up, stop and diagnose it before repeated resets or repeated dry cycling create a bigger failure.
Australian Compliance Why a Licensed Plumber Is Essential
You clear the cupboard, mount the tap, connect a few hoses, and the unit appears to run fine. Six months later, a slow leak damages the cabinet base or a warranty claim is knocked back, and the problem is no longer the unit. It is the installation record.
That is the part many Australian tutorials skip. Under-sink boiling water units sit in an awkward spot for DIY. Some prep work is straightforward, but once the job involves fixed plumbing, isolation valves, pressure control, or changes to existing pipework, it moves into licensed plumbing work. That has legal consequences, and it can affect whether the product remains covered by warranty and whether an insurer treats later water damage as a covered event.
The compliance issue is practical, not academic
In Australian homes, compliance is tied to how the unit is connected, not just whether hot water comes out of the tap. Manufacturers set installation conditions for a reason. These appliances operate under pressure, generate near-boiling water, and are usually tucked into cupboards where a minor fault can go unnoticed until there is cabinet damage, flooring damage, or mould.
WaterMark approval matters here too. The unit and its fittings need to be suitable for use in Australia, and the installation method needs to match the product requirements. If someone modifies the connection in a way the manufacturer does not allow, that can put the warranty at risk even if the unit appears to work normally on day one.
If you are still comparing options before booking the plumbing work, this guide to under-sink hot water systems gives a useful overview of the common setups used in homes, offices, and commercial kitchens.
Why insurers and manufacturers look closely at the install
A boiling water unit is not judged only by performance. It is judged by whether it was installed in a compliant way with approved components and correct protection on the water side. That is why paperwork matters. A licensed plumber can identify supply pressure issues, valve requirements, and connection risks that are easy to miss if you are focused only on getting the tap fitted neatly through the bench.
Insurers take a similar view after a failure. If there is a leak from altered under-sink pipework or a connection that was not installed as required, the argument can shift from damage repair to whether the work itself was compliant.
There is also a safety angle. Boiling water at a sink needs the correct tap, the correct controls, and the correct installation method. That is not box-ticking. It reduces the chance of scalding, pressure problems, and hidden leaks in a confined cabinet space.
What a homeowner can do, and where the line is
Homeowners can handle planning and preparation. The actual connection to the plumbing system should be left to a licensed plumber.
| DIY-Friendly Tasks | Licensed Plumber Required |
|---|---|
| Measure cabinet space and check shelf or door clearance | Connect the unit to fixed mains plumbing |
| Choose a WaterMark-certified unit and matching tap | Install isolation valves and pressure-rated plumbing connections |
| Clear storage items and allow space for the filter | Alter existing under-sink copper, PEX, or flexible pipework |
| Check that a suitable nearby power point already exists | Carry out final plumbing checks for leaks, operation, and compliance |
| Read the manufacturer instructions and confirm service access | Complete work needed to protect warranty and compliance position |
That split is the sensible trade-off. You can do the organising, make access easy, and avoid service headaches later. The licensed plumber handles the part that carries the legal and financial risk.
Suppliers in Australia, including Ring Hot Water, provide units, filters, spare parts, and fittings suited to these systems. The product choice is only half the job. The connection method is what protects the install when a warranty claim, insurance query, or compliance question comes up later.
Online videos can show the sequence. They do not prove the work is compliant in Australia, and they do not protect your warranty if the plumbing connection was done outside the rules.
Maintenance Troubleshooting and Your Next Steps
A properly installed unit doesn't need constant attention, but it does need routine care. The biggest long-term mistake isn't usually dramatic. It's neglect. Filters get left too long, scale builds up unnoticed, and the first sign of trouble is poor performance or an element failure.
The maintenance that actually matters
Start with filtration. The Australian Water Quality Association reports that 70% of boiler element failures in the AU region come from scaling caused by unfiltered hard water, and skipping pre-filtration in hard water areas like Melbourne can reduce boiler lifespan by up to 50%.
For most households, the maintenance checklist is straightforward:
- Replace the filter cartridge on schedule: Follow the manufacturer interval. Many units need regular cartridge changes to protect water quality and the heating system.
- Check the cupboard floor and fittings: Look for moisture, staining, or mineral deposits around joins.
- Keep the unit accessible: Don't pack cleaning products or bins around the boiler so tightly that service access disappears.
- Watch for changes in flow: A weaker stream, sputtering, or unusual noise can point to air or restriction in the line.
Common faults and what they usually mean
If the tap spits and splutters after service work or a filter change, there may be air trapped in the system. Run the tap as directed by the manufacturer and let the flow stabilise.
If you notice dripping, don't assume every drip means the same thing. Check whether it's coming from a threaded joint, a push-fit connection, or the tap itself. A cabinet that stays dry is a good sign. Moisture that returns after wiping needs proper diagnosis.
If the unit stops heating, don't keep cycling the power. A commissioning problem, scale issue, or failed component needs to be identified before more damage is done.
The sensible next move
The true value of a boiling water unit isn't just convenience. It's convenience that stays safe and trouble-free because the install was done properly from the start. That means the unit fits the cupboard, the filtration suits local water conditions, the plumbing is compliant, and the commissioning sequence was followed in the right order.
If you're unsure where your job sits between DIY prep and licensed plumbing, get that sorted before the tap goes in.
If you want a compliant under-sink boiling water installation, replacement filter setup, or help choosing the right parts for your kitchen, Ring Hot Water can help with Melbourne installation, repairs, and Australia-wide supply of compatible units, filters, valves, and fittings.
