Uncategorized
Insinkerator Hot Water Tap Leaking from Top: 2026 Fix Guide
Jun
You wipe the bench, come back ten minutes later, and there it is again. A small puddle around the top of the InSinkErator tap, or a bead of water tracking down from the spout housing onto the sink. It's frustrating because these taps are meant to be convenient, tidy, and reliable. When one starts leaking from the top, it's often assumed the tap itself has failed.
Sometimes that's true. Often, it isn't.
With an InSinkErator hot water tap leaking from top, the expensive mistake is replacing parts before you've proved where the fault sits. A top-side leak can come from the faucet body, from venting behaviour, or from an installation issue that keeps stressing the tap until it shows up as a drip at the spout or housing. The right fix depends on which one you're dealing with.
That Annoying Puddle Around Your Insinkerator Tap
A common call starts the same way. The owner notices moisture near the tap body, wipes it away, then sees it come back after the system heats or after someone uses the hot side. Because the water appears at the top, the immediate reaction is to order a new tap head and hope for the best.
That approach works only when the faucet itself is definitely the problem.
What usually helps more is slowing down and treating the leak like a diagnosis job, not a parts job. With these systems, the location of the water matters. A drip from the spout, seepage around the top housing, moisture under the sink at a fitting, or signs of venting can point in different directions. A leak that looks minor on the surface can be the symptom of a bad seal, a blocked path, or an installation layout that was never quite right in the first place.
If you've landed here because your premium kitchen tap has started misbehaving, you're in the right mindset. The useful path is to identify the source first, then repair only what needs repairing. That saves time, avoids swapping good parts, and reduces the chance of making the problem worse.
If you want a separate overview of the unit and common service issues, this InSinkErator hot water tap guide is a handy companion read.
Practical rule: If you can't say exactly where the water first appears, you're not ready to replace anything yet.
Uncovering the Common Causes of a Top-Side Leak
Most top-side leaks fall into a short list of causes. The trick is not confusing the visible symptom with the actual fault.
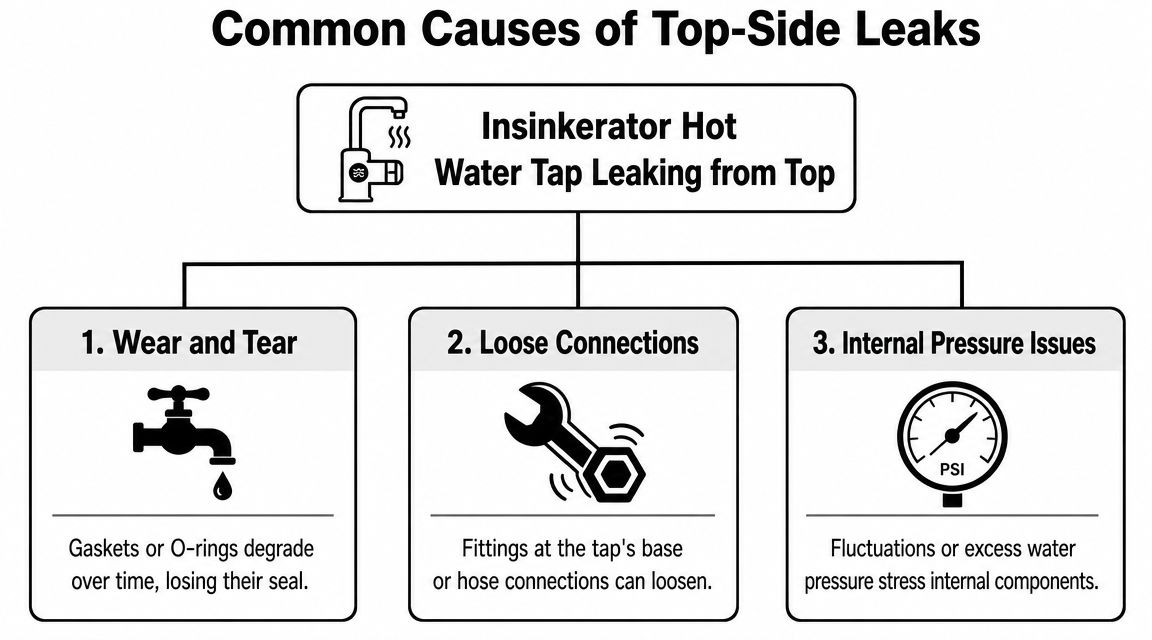
Wear inside the faucet
The most obvious cause is faucet-side wear. Inside the tap are sealing components that do the quiet work of keeping water where it belongs. Over time, O-rings, internal seals, and valve parts can harden, wear, or stop sealing cleanly.
When that happens, water often shows up around the spout, handle area, or upper body of the tap. This is the fault many DIYers expect, and sometimes they're right. But it shouldn't be your first assumption.
Venting and flow-path problems
Hot water dispenser taps don't behave like a standard mixer. They rely on a proper path for water movement and venting. If that path is obstructed, water can present at the faucet in ways that look like simple leakage but are really a sign the system isn't breathing or moving water as intended.
Blocked vent tubes and awkward tubing runs are easy to miss because the leak appears up top, while the actual cause sits below the sink. That's why a visual check above the bench rarely tells the full story.
A top leak isn't always a failed tap. Sometimes the tap is only where the system is showing distress.
Installation geometry and pressure issues
This is the part basic guides often skip, and it matters.
According to the manufacturer's troubleshooting information, the system is designed to operate at a minimum of 30 PSI, and the maximum distance between the tank and faucet should not exceed 16 inches. If the setup falls outside those limits, leaks or venting problems can occur at the faucet or spout area, and if the faucet connection below the sink is leaking, the stated fix is to tighten the connection and replace the faucet if the leak persists, as outlined in the InSinkErator troubleshooting guide.
That changes the way you think about an InSinkErator hot water tap leaking from top. It may not be random wear at all. It may be the system telling you the pressure conditions or under-sink layout are wrong.
Here's the practical breakdown:
- If the tank is mounted too far from the tap, tubing routing can create poor venting behaviour.
- If the setup has been altered under the sink, the original working geometry may have been lost.
- If a fitting below is weeping, water can track in ways that make the tap appear to be the source.
Safety First and Your Repair Toolkit
Before you touch a fitting, make the unit safe. These systems store very hot water, and even a simple check can turn messy fast if you skip isolation.
Start with two absolute musts:
- Switch off power to the tank at the wall socket.
- Shut off the cold water supply feeding the unit under the sink.
Then give the area a moment and set up properly. Keep towels down, place a bucket where disconnected tubing might drain, and clear enough space that you're not working one-handed around cleaning bottles and rubbish bags.
If you're not sure which isolation valve controls the feed, this guide to the shut-off valve under the sink will help you identify it before you begin.
DIY repair checklist
| Item | Purpose |
|---|---|
| Adjustable wrench | Loosening or snugging fittings without damaging them |
| Screwdrivers | Removing covers or access fasteners if fitted |
| Bucket | Catching residual water when lines are disconnected |
| Old towels or rags | Drying fittings and tracking fresh drips accurately |
| Torch or work light | Seeing the base of the faucet and tubing path clearly |
| Phone camera | Taking photos before disassembly so reassembly is easier |
| Replacement O-rings or seals | Common fix if the faucet-side diagnosis is confirmed |
| Replacement faucet cartridge or faucet assembly | Needed if internal faucet components are worn beyond simple seal replacement |
What not to do
A few habits create more trouble than the leak itself:
- Don't work on a live heated unit. Hot discharge and pressure changes can catch you out.
- Don't overtighten blindly. A gentle snug is one thing. Crushing a fitting or distorting a seal is another.
- Don't pull tubing hard to make space. If routing is already marginal, extra strain can create a new problem.
Pinpointing the Exact Source of the Leak
This is the part that saves the most wasted effort. Instead of guessing whether the tap, tank, or tubing is at fault, isolate the faucet and see what changes.
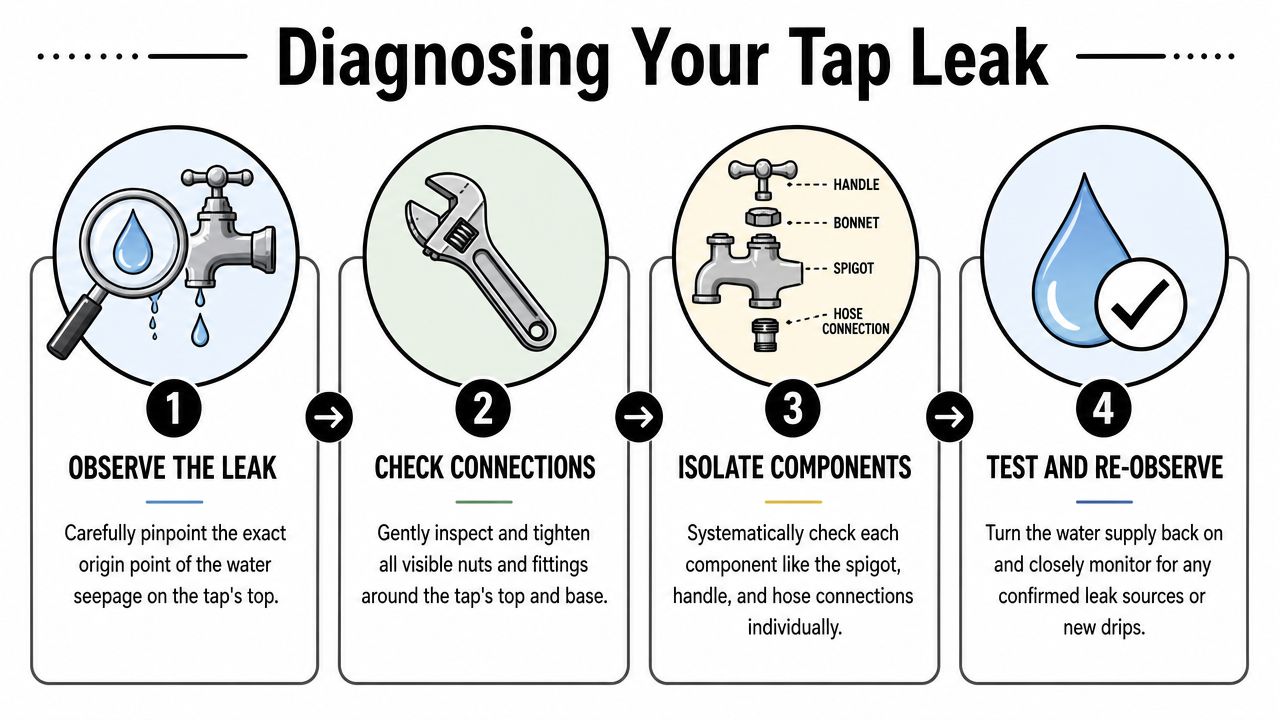
First confirm the true starting point
Dry everything thoroughly first. Don't inspect a wet tap and trust what you think you're seeing. Water travels.
Use a towel or rag to dry:
- the spout
- the top housing
- the handle area
- the base of the faucet above the sink
- the fittings directly beneath the sink
Then wait and observe. You're looking for the first new appearance of water, not the place where water eventually collects.
The isolation test that narrows it down fast
For a top-side leak, the most useful diagnostic method is to isolate the tap from the tank and test the faucet body under live water pressure. The process is to shut off the supply, disconnect the blue inlet line, and observe whether dripping continues at the spout or housing. If the leak persists after isolation, the fault points to the faucet side, as described in this hot-water dispenser leak repair walkthrough.
In plain terms, here's how to do it carefully:
- Power the unit down and confirm the water supply is off.
- Place a bucket and towels under the faucet connection area.
- Locate the blue inlet line at the base of the tap under the sink.
- Disconnect that line carefully. Expect some residual water.
- Restore water only as needed for the observation while keeping the tank side isolated from the faucet path you're testing.
- Watch the tap body closely at the spout and housing.
The result gives you a clean decision point.
How to read the result
If the tap still drips from the top after isolation, the faucet body is the prime suspect. That usually means an internal sealing issue, a worn O-ring, a cartridge problem, or another fault inside the tap assembly itself.
If the leak stops, the source is more likely upstream. That shifts your attention to the supply path, the tank side, or the way the system is installed and venting.
If isolation changes the symptom, believe the test. Don't go back to guessing.
Quick field checks while you're under the sink
Before moving to repair, check a few basics:
- Look for stressed tubing with sharp bends or tension near the faucet stem.
- Check for loose fittings under the sink that may be sending water where it shouldn't go.
- Inspect the surrounding cabinet floor for signs that a lower leak has been masquerading as a top leak.
- Examine the faucet body for visible cracking or damage. If the body itself is compromised, replacement is usually the sensible path.
Performing the DIY Repair
Once the leak has been traced properly, the repair path becomes much simpler. Stay inside the limits of what the diagnosis supports.
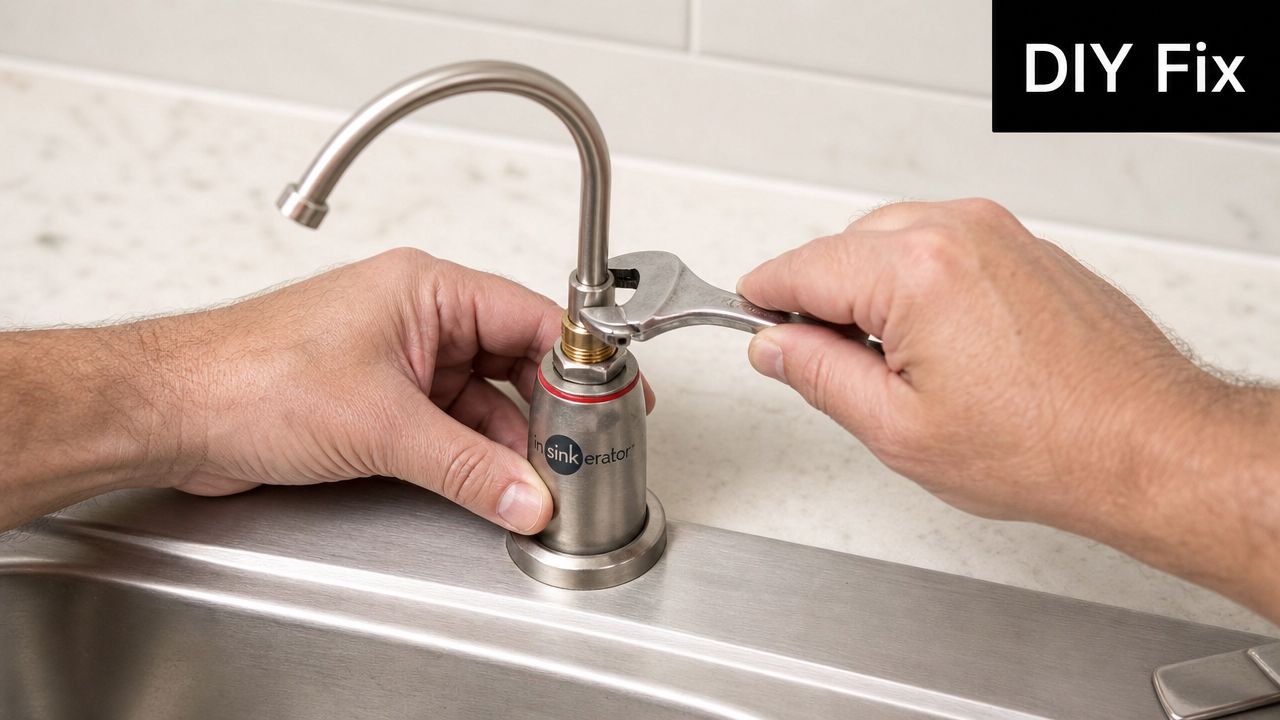
If the fault is in the faucet body
When the isolation test points to the tap, the most common DIY repair is replacing the worn sealing parts inside the faucet assembly.
Work methodically:
- Keep the power off and water isolated.
- Take photos before each step so you can reverse the order later.
- Disassemble only as far as needed to access the leaking part of the spout or handle assembly.
- Inspect O-rings and seals for flattening, splitting, hardening, or obvious wear.
- Replace like for like using the correct parts for your model.
- Reassemble gently and make sure everything seats squarely.
A rushed repair often fails because a seal twists during fitting or a mating surface wasn't cleaned before reassembly. If an O-ring looks fine but the seat is dirty or scratched, the leak can remain.
Workshop note: Photos beat memory every time, especially once small parts are on the bench.
If the issue looks like blocked venting
If your diagnosis suggests the faucet isn't the actual culprit, check the vent path and tubing arrangement before ordering parts. You're looking for kinks, compression, pinched sections, or anything that interrupts the intended flow path.
Use your hands and eyes, not force. Straighten obvious routing issues, relieve tension where possible, and make sure nothing under the sink is pressing against the tubing after the cupboard doors close.
For a visual walkthrough of common leak-finding habits and repair handling, this video is useful:
Know where DIY should stop
There's a point where a home repair stops being sensible.
Stop and get help if:
- The tap body is cracked
- The leak persists after replacing the obvious seals
- The isolation test points away from the faucet
- You can't restore the unit without uncertainty about the tubing path
- Any fitting feels seized, fragile, or likely to break if pushed further
A careful DIY repair is worthwhile when the diagnosis is clear. It's not worthwhile when you're drifting into trial and error.
When to Call a Ring Hot Water Professional
Calling a professional isn't giving up. It's often the fastest way to protect the tap, the cabinet, and your time.
The smart time to stop is when the fault has been narrowed down but not safely solved with a straightforward seal or fitting correction. That's especially true with premium boiling water taps, because replacing the wrong part can cost more than the original service call would have.
You should book help if any of these apply:
- The leak continues after faucet seal replacement. That usually means the original diagnosis needs a second look, or the faucet has a deeper internal fault.
- The isolation test points upstream. Once the problem appears to involve the tank side or supply path, the job is no longer a simple top-end repair.
- There's visible damage to the tap body. Cracks, deformation, or damaged threaded sections rarely reward patch attempts.
- The under-sink layout looks wrong or heavily altered. A tidy professional reset can solve recurring issues that piecemeal DIY adjustments won't.
- You're not comfortable disconnecting heated water components. That's a perfectly good reason to hand it over.
For Melbourne-area servicing, an InSinkErator service technician can diagnose the fault properly, confirm whether the issue is faucet-side or upstream, and fit the correct genuine parts where needed.
A leaking tap at the top can look small, but repeated moisture around the sink can stain surfaces, damage cabinetry, and keep returning if the root cause isn't fixed. The best result comes from matching the repair to the diagnosis, not the symptom.
If your InSinkErator hot water tap is leaking from the top and you want the fault diagnosed properly, Ring Hot Water can help. Melbourne customers can book expert repair and service support, and customers Australia-wide can source genuine spare parts and fittings through the online store.
