Water Filters
Under Sink Water Filter Installation: A Melbourne Guide
Apr
You notice it first in a glass of tap water or the kettle. The taste is a bit sharp, the smell leans chlorinated, and the idea of buying another pack of bottled water feels wasteful and expensive. In a lot of Melbourne homes and staff kitchens, that is the point where people start looking under the sink instead of at another benchtop jug.
An under sink filter is one of the cleanest upgrades you can make to a kitchen. It hides out of sight, keeps the bench clear, and gives you filtered water where you use it. For many homes, it also pairs neatly with instant boiling and chilled tap setups, which is why this type of system keeps coming up in kitchen renovations, office fit-outs, and hospitality refurbishments across Melbourne.
The part many online guides miss is the Australian side of the job. A lot of generic tutorials are written around US fittings, US valves, and products that are not necessarily compliant here. In Melbourne, a good under sink water filter installation is not just about making the tubing fit. It needs to suit local pressure conditions, use WaterMark-certified parts where required, and align with AS/NZS 3500 so the installation is safe, legal, and worth relying on.
Why Melbourne is Embracing Filtered Water at Home and Work
In Melbourne, the push toward filtered water usually starts with something ordinary. A family gets tired of filling bottles from the fridge and still not liking the taste. An office manager wants better water in the staff room without cluttering the counter with dispensers. A cafe owner wants more consistent water for tea, coffee, and cooking.
That is where under-sink systems make sense. They solve a daily problem without taking over the room.
According to Angi’s installation cost overview, hard water affects over 80% of households in Melbourne and under-sink water filter installations have surged by 45% since 2020. The same source notes that Victoria recorded over 150,000 residential plumbing installations for water filtration systems in 2023, with under-sink models making up 62% of these.
Why this style of filter suits Melbourne kitchens
A lot of Melbourne kitchens do not have much spare bench space. Under-sink systems keep the filter body tucked inside the cabinet, which matters in compact homes, apartments, and renovated terraces where every bit of room counts.
They also suit the way people use water now. Most households do not want a whole-house filtration setup just to improve drinking water at one kitchen sink. They want filtered water for glasses, cooking, kettles, and coffee machines. An under-sink unit does that with less equipment and less visual clutter.
Homeowners and workplaces want the same thing
At home, it is usually about taste, convenience, and cutting out bottled water. In workplaces, the priorities shift slightly. Staff want easier access to better-tasting water. Facility managers want a tidy system that sits out of sight and integrates with existing tapware or a dedicated drinking tap.
Hospitality venues often care about equipment protection as much as drinking quality. Filtered water can help upstream of boiling taps and beverage equipment, which is one reason this category keeps growing in commercial kitchens and back-of-house areas.
Practical takeaway: If the main issue is drinking and cooking water at one sink, an under-sink system is often the simplest fit. You get targeted filtration where it matters most, without rebuilding the whole plumbing setup.
Choosing a Compliant Filter System for Your Property
Picking the right unit is not just about brand or cartridge count. The right system depends on your water concerns, the space under the sink, whether you need a dedicated filtered tap, and whether every component is suitable for Australian plumbing conditions.
The compliance side matters more than many buyers realise.
According to a 2025 Victorian Building Authority note referenced in this installation article, 28% of DIY plumbing installs fail inspections due to non-compliant fittings, and under-sink filters are a common problem area when buyers use imported gear that lacks WaterMark certification required under Australian law.
Start with the water problem you are trying to solve
Not every under-sink filter does the same job.
Sediment filters are the first line of defence where you want to catch visible particles and protect downstream cartridges. They are common as a pre-filter in multi-stage systems.
Carbon filters are the usual choice when taste and odour are the main complaints. If your issue is chlorine taste in drinking water, a carbon stage is often the practical starting point.
Multi-stage systems combine sediment and carbon media to handle several common issues at once. They suit most homes that want better everyday drinking water without stepping up to a more complex setup.
Reverse osmosis systems go further. They are typically chosen where the brief is broader, such as reducing a wider range of dissolved contaminants or feeding high-value appliances that benefit from more refined water treatment. They also take more room, involve more plumbing, and need more careful setup.
If you are comparing options for local conditions, this guide to an under-sink water filter in Melbourne is a useful starting point for thinking about system type, layout, and intended use.
WaterMark is not a small detail
A lot of online marketplaces sell filter kits that look fine in photos. The issue often shows up later. The threads are wrong for local valves, the tap is not approved for potable water use here, or the fittings are not certified for Australian requirements.
For an under sink water filter installation in Melbourne, WaterMark-certified parts are the safe path. That includes the fittings, valve components, and any tapware connected into the drinking water line where certification is required.
Why it matters:
- Legal compliance: Australian plumbing work is governed by standards and product approval requirements.
- Insurance and warranty protection: If there is a leak or failure, non-compliant parts can create a messy argument.
- Pressure suitability: Melbourne mains conditions can be harder on poor-quality imported fittings than buyers expect.
- Backflow and safety: The right parts are selected with local rules in mind, not adapted after the fact.
Match the system to the cabinet, not just the brochure
A brochure might show a neat install in a roomy cabinet. Real kitchens are different. You may have a pull-out bin, disposer, instant boiling unit, shelf, trap, or dishwasher hose already occupying the space.
Look for a system that allows:
- easy cartridge changes
- sensible tubing runs
- access to the shut-off valve
- enough room to mount the bracket properly
- enough clearance to service the unit later
A compact two-stage or three-stage unit is often easier to live with than an oversized system crammed into a tight cabinet.
Be realistic about RO trade-offs
RO can be excellent in the right application, but it is not automatically the best option for every kitchen.
It usually means a more involved install, more tubing, a drain connection, and a larger footprint. If the cabinet is crowded or the existing plumbing is old, the job can go sideways quickly. In many homes, a quality multi-stage carbon-based system gives the result people want without the extra complexity.
Trade view: The best filter is the one that solves the water issue, fits the available space, and uses compliant Australian-approved parts. The fanciest system on paper is not always the best install in practice.
Your Essential Tools and Parts Checklist for a Smooth Installation
A smooth job starts before the water is turned off. Most DIY problems happen because the installer assumes the kit box has everything, then discovers halfway through that the thread type is wrong, the shut-off valve is seized, or the tap hole needs a tool they do not own.
For local installs, I always tell people to think in two groups. First, the everyday hand tools. Second, the fittings and consumables that need to suit Australian plumbing.
What to gather before you begin
You will usually want these tools close by:
- Adjustable spanner: For isolating valves, compression nuts, and adapting existing connections.
- Tube cutter: Better than crushing plastic tube with the wrong cutter.
- Cordless drill: Needed for bracket mounting, and sometimes for tap installation.
- Spirit level: Useful when mounting the bracket so cartridges hang straight.
- Torch or work light: Under-sink visibility is often poor.
- Bucket and towels: There is almost always a bit of residual water.
- Thread seal tape: Use it correctly on threaded connections where specified by the manufacturer.
- Marker or pencil: For bracket position and pilot holes.
For parts, check the supplied kit against the plumbing under your sink. A typical local install may need 1/2″ BSP fittings, suitable tubing, a compliant T-adapter, and reliable push-fit connectors such as John Guest components.
If your existing isolation valve is old, stiff, or weeping, deal with that before connecting a brand-new filter. This guide on a shut-off valve is worth reading if you are unsure what you are looking at under the sink.
DIY Under-Sink Filter Installation Checklist
| Item | Category | Pro Tip / Where to Source |
|---|---|---|
| Adjustable spanner | Tool | Use two spanners where needed so you do not twist existing pipework |
| Tube cutter | Tool | A clean square cut helps push-fit fittings seal properly |
| Drill and bits | Tool | Keep timber and stone drilling needs separate |
| Spirit level | Tool | A level bracket makes cartridge changes easier later |
| Bucket and towels | Prep | Put them in place before disconnecting anything |
| Thread seal tape | Consumable | Use only where the fitting design calls for it |
| WaterMark-certified T-adapter | Part | Check thread compatibility with local plumbing |
| John Guest push-fit fittings | Part | Good for neat runs and serviceable connections |
| 1/2″ BSP adaptors | Part | Commonly needed on Australian plumbing |
| Filter tubing | Part | Avoid sharp bends and leave service slack |
| Dedicated filter tap | Part | Confirm whether the benchtop already has a spare hole |
| Angle stop or isolation valve parts | Part | Replace tired valves before they fail under pressure |
Benchtop drilling changes the job
If your sink or benchtop already has a spare hole, the install is much simpler. If not, the difficulty jumps quickly.
Stone, granite, and engineered surfaces need the right bit, patience, and a steady hand. That is the point where many confident DIYers decide the plumbing side is manageable but the tap hole is not worth risking.
Tip: Lay out every fitting in installation order before you begin. If one adaptor looks questionable on the bench, it will not become compliant or leak-free once it is hidden in the cabinet.
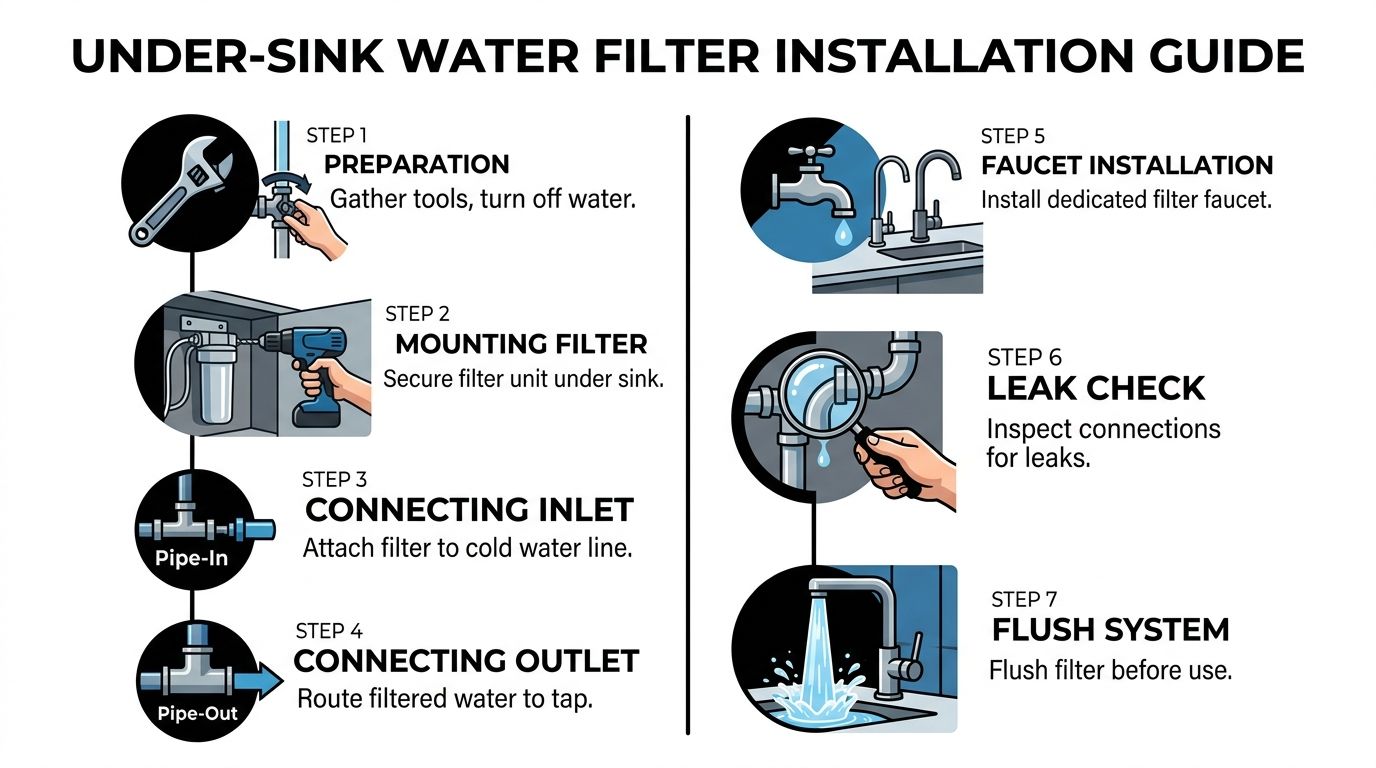
The Complete Installation Process From Start to Finish
A proper under sink water filter installation is a sequence, not a rush. The cleanest jobs are the ones where each connection is thought through before the tubing is cut. That matters under a Melbourne sink, where space is often tight and existing plumbing can be older than it looks.
This visual gives a quick overview before getting into the detail.
Check the cabinet and isolate the water
Open the cabinet fully and clear it out. You need to see the cold supply, trap, dishwasher hose, power leads, and any other appliances sharing the space.
Make sure the system will sit where you can still change cartridges later. If the filter body blocks the valve or collides with the waste, rethink the position now.
Turn off the cold water isolation valve and confirm it shuts off. Then open the kitchen mixer to release pressure. Keep a bucket underneath before loosening anything.
Mount the filter where it can be serviced
Wall mounting sounds simple, but location matters more than people think. The unit should be high enough to avoid cabinet floor moisture and low enough that cartridges can still be removed.
Fix the bracket to a solid part of the cabinet, not thin backing that flexes. If the system uses multiple canisters, check the spacing so each one can drop out for maintenance.
The tubing route should feel natural. Tight loops and awkward crossings create future headaches.
Trade habit: Leave gentle curves in the tubing instead of pulling it drum-tight. A tidy install is not the same as a strained one.
Make the inlet connection properly
Make the inlet connection properly. Many DIY leaks start at this point. The filter inlet is usually taken from the cold supply line using a compliant tee or adaptor that suits the local valve and thread pattern.
If the fitting is threaded and the manufacturer calls for thread seal tape, apply it neatly. A good rule from the field is 4 wraps clockwise, which is also noted in Aquaman’s installation guidance. The same source states that professional installation success rates exceed 98% leak-free on the first test, and points to over-tightening compression nuts as a cause of 25% of DIY failures.
That tracks with what plumbers see. Overtightening feels secure in the moment, then cracks a fitting, distorts an olive, or damages the seat. Tight enough is not the same as as-hard-as-possible.
If you are using push-fit fittings, make sure the tube is cut square and fully seated. If the tubing goes in crooked, the seal may hold briefly and then weep once pressure cycles through the line.
Route the tubing without creating future faults
Tubing needs support and slack. It should not rub on sharp cabinet edges, kink around the trap, or sit where bins and cleaning products will knock it loose.
A simple rule is to avoid tight turns. Keep the run smooth from the inlet to the filter and from the filter to the tap. If a run wants to fold in on itself, use a better route or a suitable fitting rather than forcing the bend.
This matters even more when the cabinet also contains a boiling tap unit, chiller, or dishwasher hose. Crowded cupboards punish lazy tube routing.
Install the filtered water tap carefully
Some sinks already have a spare hole. If yours does, use it. That removes the riskiest part of many DIY installs.
If you need to drill, pause and think about the surface. Stainless steel is one thing. Granite, stone, and engineered tops are another. A chipped benchtop costs more than a plumber.
The tap also needs stable fixing underneath. If the base can twist when the handle is used, the tubing connection below will eventually feel that movement.
A dedicated filtered tap is common, but some systems can feed another approved outlet arrangement. Follow the product instructions closely and do not improvise with non-matching adapters just because they seem close enough.
Take your time with RO systems and hard water planning
RO installs are not standard cartridge swaps. They often involve extra stages, a drain connection, and more decisions about layout.
Where hardness is part of the broader water treatment conversation, it is useful to understand how point-of-use filtration differs from whole-of-property treatment. If you are comparing approaches, this guide on how to plumb a water softener gives helpful background on where softening sits in the plumbing system versus a kitchen drinking water filter.
For many homes, the under-sink unit is there to improve drinking and cooking water at one sink. It is not a substitute for every other water quality strategy. Keeping those roles separate leads to better system choices.
Bring the pressure back slowly and watch every joint
Once all lines are connected, reopen the isolation valve slowly. Do not snap it fully open.
Let the filter housing fill gradually while you watch every connection by eye and by hand. A dry finger under each joint will find a fine weep faster than a quick glance. Check around the adaptor, around each push-fit, and under the tap shank.
If anything leaks, isolate the water again before tightening or reseating the fitting. Do not chase a leak on a live pressurised connection unless you know exactly what the fitting requires.
A useful walk-through sits below if you want a second visual reference before testing the system.
Flush the cartridges before drinking from it
New cartridges often need flushing. Carbon media in particular can release fine black particles at first.
Run the filtered tap for the flush period specified by the manufacturer. Do not judge taste, clarity, or flow until that initial flush is complete. A system that looks imperfect in the first moments can be completely normal until it has been properly commissioned.
Testing Your New System and Troubleshooting Common Issues
Many DIY installs look finished before they are ready. Testing begins once the unit is under pressure, flushed, and left long enough for small faults to show themselves.
That final check matters because the most common problems are not dramatic. They are slow leaks, poor flow, trapped air, and water that tastes wrong because the system has not been flushed long enough.
According to Water Filter Direct’s installation guide, leaks account for 40% of reported DIY failures, over-cranked fittings account for 35%, and kinked tubing can reduce water flow by 50%. The same guide notes that a post-install flush of 5 to 10 minutes is critical to clear carbon fines.
How to test it like a plumber
Do not open the valve and walk away.
Use this sequence:
- Open the supply slowly: Let pressure build gradually through the housing and tubing.
- Check every joint dry-handed: A fingertip finds a tiny leak better than a quick look.
- Inspect under pressure: Some fittings stay dry at first and only weep once the line settles.
- Flush the system fully: Run water for the recommended period before tasting it.
- Recheck later: Come back after the first full use and inspect the cabinet again.
If water is leaking
Most leaks come from one of three places. A threaded fitting was sealed poorly, a compression fitting was overtightened or misaligned, or a push-fit connection did not get a clean square tube insertion.
Look at the type of fitting before touching it. Tightening everything blindly often makes it worse.
- Threaded joint leaking: Isolate the water, undo the fitting, inspect the threads, and reseal correctly if the fitting design requires tape.
- Push-fit leaking: Remove the tube, trim it square if needed, and reinsert fully.
- Compression joint leaking: Check alignment first. If the fitting has already been overtightened, the damaged part may need replacement rather than another turn.
If the flow is poor
Low flow usually points to a physical restriction or a mismatch in setup.
Common causes include:
- Kinked tubing: Often hidden behind the waste or pulled too tight around another appliance.
- Partially closed isolation valve: Easy to miss after testing.
- Cartridges not seated correctly: Some systems will flow badly if a canister is not installed cleanly.
- Pressure-related mismatch: More common on complex systems, especially if the unit has been undersized or set up poorly.
If you find a bent line, do not try to massage the kink out and hope for the best. Replace the affected section if the tube wall has been creased.
Tip: If the flow was fine before you pushed everything back into the cabinet, pull it all back out and inspect the tubing path again. The cabinet pack-away is where many kinks are created.
If the water tastes odd
A new carbon filter can produce an initial taste or discolouration until it is flushed through. That does not automatically mean anything is wrong.
Work through it in order:
- Confirm the cartridges are installed in the correct direction.
- Flush the system for the full recommended time.
- Check whether the taste is coming from the filtered tap only, or from the main mixer as well.
- If the issue remains, recheck the cartridge seating and product instructions.
If the cabinet smells damp but you cannot see a leak
This usually means a very slow weep or trapped water from the install. Dry the whole area thoroughly, place dry paper towel under each connection, and check again after use. The paper will show exactly where moisture starts.
That method is simple, but it saves a lot of guesswork.
When to Skip DIY and Book a Professional Installation
Some under-sink jobs are straightforward. Others only look straightforward until the cabinet door opens. Knowing the difference saves time, frustration, and in some cases a damaged benchtop or a non-compliant installation.
This is one of those areas where honesty helps. If the valve is accessible, the kit is compliant, the cabinet is roomy, and the tap hole already exists, many capable homeowners can manage a basic install. If several variables are stacked against you, professional installation is usually the cheaper decision in the end.
The commercial side of the market shows how established these systems have become. According to GM Insights, the Australian under-sink water filter market is valued at AUD 450 million. The same source says professional installation for multi-stage RO systems costs around AUD 1,000, compared with AUD 3,000+ for whole-home systems, and notes that professional work helps address the 15% failure rate from improper pressure management seen in poor installations.
Good reasons to call a professional
A pro is worth it when the job includes any of the following:
- Old shut-off valves: If the valve will not isolate cleanly, the filter install is not the first problem.
- Stone or engineered benchtops: Drilling the tap hole is where expensive mistakes happen.
- RO systems: These are more involved and less forgiving than a simple single-point carbon filter.
- Tight or crowded cabinetry: Dishwashers, pull-out bins, traps, and boiling tap units reduce the margin for error.
- Compliance uncertainty: If you are not sure whether the components are WaterMark-certified and suited to local rules, stop and verify before installing.
- Low confidence with plumbing connections: A small leak under a sink can sit unnoticed and damage cabinetry before anyone spots it.
DIY time versus professional time
DIY can be satisfying when the conditions are right, but it often stretches longer than expected because the delays are not in the main steps. They are in the interruptions. A seized valve. The wrong adaptor. A missing drill bit. A tube run that has to be redone because the cupboard contents crush it.
Professional installers deal with those variables every day. They also tend to recognise warning signs early, such as valves nearing failure, bad access, or fittings that should not be trusted.
If you are weighing up the options, this overview of water filter installation in Melbourne can help you compare what is involved before deciding.
Practical line in the sand: If the install needs compliance judgement, stone drilling, pressure troubleshooting, or remedial valve work, it has moved beyond a casual weekend DIY project.
Frequently Asked Questions about Under-Sink Filters
Will an under-sink filter reduce my water pressure
It can, depending on the system design, cartridge condition, and tubing layout. A well-chosen standard system should still feel usable at the tap. If the flow feels poor straight after install, check for kinked tube, a partially open valve, or an incorrectly seated cartridge before assuming the filter itself is the problem.
Can I connect an under-sink filter to a fridge or ice maker
Sometimes, yes. It depends on the filter capacity, pressure characteristics, and whether the layout suits an extra outlet line. This is one of those jobs where planning matters more than improvising after the fact.
How often do the filters need changing
That depends on the cartridge type and the water use in the property. The best approach is to follow the manufacturer’s replacement schedule and change them earlier if taste, odour, or flow starts to drop off.
Do I need a dedicated tap
Many systems do use a separate filtered water tap. Some setups can integrate differently, but the approved connection method should match the product design and local compliance requirements.
Is DIY legal in Victoria
Some simple tasks may look manageable, but legality depends on the plumbing work involved and whether compliant products and methods are used. If the job touches regulated plumbing work or you are unsure about compliance, get licensed advice before proceeding.
If you want a compliant, tidy, Melbourne-ready result without the guesswork, Ring Hot Water can help with under-sink filter supply, genuine fittings, spare parts, and professional installation support for homes, offices, and hospitality sites.
